Friday, December 21, 2012

Christmas Stocking Card

Good Evening to you all!

I've been so busy decorating, shopping, wrapping gifts, planning Christmas meals, playing Dragon Vale (oh I know that doesn't have anything to do with Christmas but it is so much fun to play) and browsing through Pinterest for Christmas ideas, that I haven't had much time for crafting...

I had originally planned on making Christmas Cards for family and friends this year too, but well... I've run out of time so maybe next year hahaha.  I did however find some time today to finish a little Christmas Stocking Card that I will save for next year.  I was inspired by a card my mother sent us.  It had the cutest Christmas stocking on the front of it.  I had bought some cut out stockings, which were just the right size; at our local Michael's Craft Store awhile back so I used one as a stencil for cutting out my card.  I cut a heal and toe piece and a cuff for the top of the stocking.  I also cut out a bunch of snowflakes and covered them with Star Dust Stickles to make them shine.  I layered large and small snowflakes together, added a pearl to the middle and attached them to the stocking cuff.  The cuff paper already had snowflakes on it so I just added the ones I made onto those.  The Joy tag is a pre-printed tag from the 6x6 paper pack I used.  I don't know if you can tell or not, but I added Glossy Accents to the letters to make them stand out.  I haven't put anything on the inside of my card yet, I'll probably wait to do that until I know who I will be giving it to.

Soooooo here it is...enjoy!
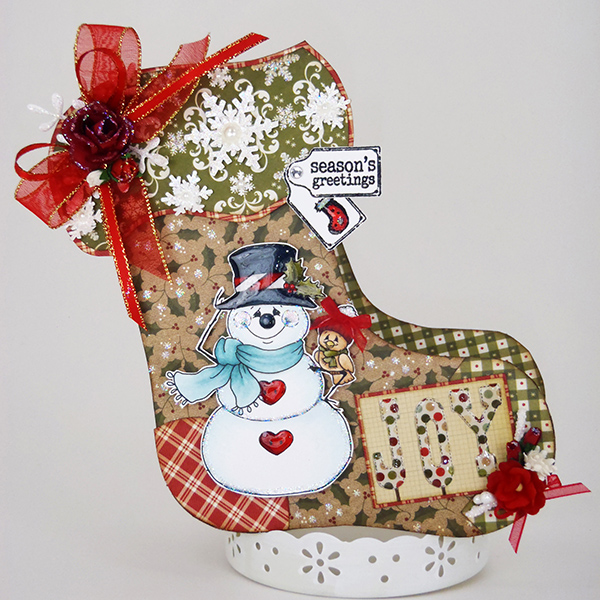
Front

Peek of Inside

My Card Recipe:
     Digital - Snowman Top O'The Mornin by Whimsy Stamps
     Stamps - Christmas Mini Icon Tags & Christmas Sentiment Tags by Lily of the Valley
     Paper - Bazzill White & Handmade Holiday 6x6 paper pad by simple Stories
     Flowers - Wild Orchid Crafts
     Paper Punches - Alpine & Aspen Snowflakes by Martha Stewart
     Metal Die - Snowflake by DooHickey
     Inked Edges - Distress Ink Vintage Photo
     Sparkle & Shine - Stickles Star Dust and Glossy Accents by Inkssentials
     My Stash - Ribbon & Pearls

Colored in Copics:  Snowman BG0000, C00     Cheeks RV0000, RV00     Top Hat C5, C7, C9
Blue BG18 + 0 Blender     Red R24, R27, R39     Brown Bird E30, E31, E33    
Yellow Beak Y21, YR24     Green YG93, YG95, YG97     Grey Shading C00


Thanks for stopping by...
 
Hugs...


Tuesday, December 11, 2012

Winter and a Snowman

Good Afternoon!

Today I have a christmas card I finished  using a Saturated Canary Digital called Winter.  I thought I was going to send hand made Christmas Cards this year but...I have almost run out of time so probably will send out store bought cards instead.   :0(  

I've seen so many other diy crafts I want to work on so my card making is way behind...I am going to continue making Christmas Cards as time allows and will post them as they are done.  I'll keep them all for next year and hopefully by then I will have enough made to send to everyone on my Christmas Card List!!! 

So here is my card for today, hope you like it!

Front
Inside


My Card Recipe:

     Digital - Winter by Saturated Canary
     Stamps - Merry Wishes by Verve Stamps and Christmas Sentiment Tags & Christmas Mini Icon
          Tags by Lily of the Valley
     Paper - Bazzill White & Red, Festive 6x6 Paper Pack by Authentique
     Flowers - Wild Orchid Crafts
     Paper Punches - Ribbon Loop by Martha Stewart
     Metal Die - Card Shape is Frilly Square #10 by Go Kreate, Leaf Branch by CC Designs and
          Snowflake by DooHickey
     Inked Edges - Distress Ink Vintage Photo
     Sparkle & Shine - Stickles Star Dust, Glossy Accents by Inkssentials and Ranger Liquid Pearls
          White Opal
     My Stash - Ribbon, Lace, Pearls

Colored in Copics:  Hair - E53, E35, E37     Face - E0000, E00, RV00, RV11     Eyes - BG0000
Red - R22, R24, R27     Green - YG03, G21     Yellow - Y32, YR21, YR24     Brown - E42, E43, E44
Snow - BG0000     Grey Outline - C00


Thanks for stopping by...
 
Hugs...


Tuesday, December 4, 2012

3D Snowman Card - Teddy with Penguin


Hi and Good Afternoon,

Today, as promised yesterday, I am posting my second 3D Card.  This one was a bit harder than the first because it required so many more 3D layers but I really like how it turned out.  I again used the Shape EZ Snowy Ball Card from Whimsy Stamps.  I love these Shape EZ Cards...I'm going to pop on over to there web site and buy some more!!! 

Here is my card for today...Enjoy,


Front
Side so you can see the 3D effect
Inside

My Card Recipe:

Card Template - Shape EZ Snowy Ball Card by TLC with Whimsy
Stamps - Teddy with Penguin & Christmas Sentiment Tags by Lily of the Valley and Very Merry
     Christmas by Hero Arts
Ink - Black Momento
Paper - Bazzill White and Handmade Holiday 6x6 Paper Pad by Simple Stories
Flowers - Wild Orchid Crafts and Petaloo
Paper Punches - Snowflakes are Martha Stewart Aspen, Artic and Glacial
Metal Die - Christmas Stacker Tree by Dees Distinctively A Cut Above, Spruce Sprig & Bon
Voyage Foliage & Vintage Leaf from DooHickey
Inked Edges - Distress Ink Vintage Photo & Stormy Sky
Sparkle & Shine - Stickles Star Dust and Glossy Accents by Inkssentials
My Stash - Ribbon, Doily and Pearls

Colored in Copics:     Bear - E30, E33, E35     Red - R24, R27, R37, R39
Grey - C4, C6, C8    Orange - Y17, Y39     Snow - B0000     White Shadow - C00, C2, 0 Blender

3D Instructions - By Mariska Van Der Veer found in the Whimsy Stamps Inspirations Magazine dated December 2011 - Issue 5.

3D Background Under Pieces is Copic W5
3D Pieces were outlined using Copic W10
3D Glue is made by OLBA and called Lijm Kit...I bought this from Whimsy Stamps


Thanks for stopping by...
Hugs...


Monday, December 3, 2012

Lighted Christmas Presents on My Porch

Hello again!  I have a second post to share with you today...

I really love to decorate for Christmas so I wanted to show you the new front porch decorations that I recently finished putting together.  I saw something similar on Pinterest and had to have it.

I LOVE PINTEREST!!!

Anyway...I purchased a set of lighted presents from Bed Bath and Beyond (using my 20% off coupon of course).  Then I removed the existing ribbon and bows, which were quite ugly, so I could add my own.  First I rewrapped new ribbon around each present.  Then I wired together some red and white Christmas flowers, and a green pine & pine cone sprig that I purchased from Michaels Craft Store.  I made three different sizes, (small w/1 flower, medium w/2 flowers and large w/3flowers) one for each present.  Then added red and gold ribbon bows, that I made, to each of the flower/sprig bouquets and placed one on the top of each present.  The bouquets are removable for storage and the presents will stack inside each other to fit right back into their original box for storage after Christmas.

I also purchased the artificial tree behind them from BB&B (using another 20% off coupon...love those coupons lol).  It came with white lights and pine cones attached and it sits inside a dark brown urn shaped pot.  I added a few red ornaments from Target and this is how it all turned out!

What do you think?  I really love them! 

Front Porch Tree & Presents
 
Presents Only
 
A Close-up of Largest Present Topped with Bouquet
 
Thanks for stopping by...
 
See you tomorrow with another Snowman Card...
 
Hugs...


3D Snowman Card - Bundled Little Snowboy

Good Morning to all!

I have been very busy putting up all of my Christmas decorations this past week!  The house looks great, presents are wrapped and only a couple more gifts to buy...yeah!!!  Now that that's done I can continue on with my Christmas Projects.

I have a Christmas Card to show you today that I did a couple weeks ago.  It is my first try at 3D card making.  I saw some samples in the Whimsy Stamps Inspirations Magazine dated December 2011 by Mariska Van Der Veer.  She has some amazing stuff on her web site, sendingyoualittlesmile.blogspot.com/.  Check it out...such beautiful work! 

Anyway I made my card using the Shape EZ Snowy Ball Card by TLC at Whimsy stamps.  It turned out so cute that I made a second which I will post tomorrow!

Here's my first 3D Card...I really love it...hope you do too!


Front of Card
See the 3D Effect
Inside of Card


My Card Recipe:

     Card Template - Shape EZ Snowy Ball Card by TLC with Whimsy
     Stamps - Bundled Little Snowboy by Whimsy Stamps, Christmas Grungy Messages by LOTV
          and Giving & Receiving by Penny Black
     Ink - Black Momento
     Paper - Bazzill White and Handmade Holiday 6x6 Paper Pad by Simple Stories
     Flowers - Wild Orchid Crafts and Petaloo
     Paper Punches - Snowflakes are Martha Stewart Aspen, Artic and Glacial
     Metal Die - Christmas Stacker Tree by Dees Distinctively A Cut Above, Spruce Sprig & Bon
          Voyage Foliage from DooHickey
     Inked Edges - Distress Ink Vintage Photo & Stormy Sky
     Sparkle & Shine - Stickles Star Dust and Glossy Accents by Inkssentials
     My Stash - Ribbon, Doily and Pearls

Colored in Copics:     Snowman - BG70, BG72+0 Blender     Red - R24, R27, R37, R39
Green - YG91, YG93, YG95, YG97     Pink Cheeks - R00, R20     Orange Nose - Y39, YR04, YR07
Outline - C00     Brown - E31, E33, E35     Grey - C4, C6, C8

3D Instructions - By Mariska Van Der Veer found in the Whimsy Stamps Inspirations Magazine dated December 2011 - Issue 5.

     3D Background Under Pieces is Copic W5
     3D Pieces were outlined using Copic W10
     3D Glue is made by OLBA and called Lijm Kit...I bought this from Whimsy Stamps


Thanks for stopping by...
 
Hugs...


Saturday, November 24, 2012

Fall Pumpkins & Halloween Trick or Treat Bags


Today I have one last post for the Fall and Halloween projects I made. 

The first is two different sized plastic pumpkins painted white.  I attached lots of swirls in different shapes and styles, then added a pretty flower in the center.  They looked great on my entry table through out the fall season.

The second is the Halloween Trick or Treat Bags I made for the neighborhood kids.

Here they are... enjoy...


Large 9" Pumpkin
Small 6" Pumpkin

Trick or Treat Bag


My Crafting Recipe for Pumpkins:

The Pumpkins were purchased from Michaels and painted white then varnished.  Stems were painted brown then varnished.  The pumpkins are two different sizes...9" wide and 6" wide.

The swirls were made by Kaiser Craft, Recollections, Prima and Zva Creative.  I purchased them from several different craft stores in my area.

The flowers are by Recollections from Michaels Craft Store.


My Crafting Recipe for Trick or Treat Bags:

Black Bazzill card stock paper punched along one side using Martha Stewart's Spiderweb punch.  The purple, green printed papers & cut out pumpkins are from a 12x12 paper pack by K&Company called Halloween Designer Paper.  The Words are cut from a 12x12 paper pack by Martha Stewart called Carnival.

The Cat Sticker is by Recollections.  I used many different types of stickers and all were from Recollections which I purchased from Michaels Craft Store.

The colored papers were punched using Nesting Scallops by Lifestyle Crafts and the purple paper shape is Labels Four by Spellbinders.

The bag is purchased from Michaels Craft Store and then filled with different candies from the grocery store.


Thanks for stopping by...
 
Hugs...


Monday, November 19, 2012

Ice Cream & Pickles - Baby Shower Card


Good Morning!  It's a beautiful Monday afternoon and I have just finished a cute card for my Niece's Baby shower.  She is having a little girl so I made the card quite girlie.  I really love the Saturated Canary Digital Ice Cream & Pickles.  You can find the website on my side bar, just double click and it will go directly to the Saturated Canary Shoppe.

Hope you're having a wonderful Monday...here is my card, Enjoy!!!


Front
 
Inside
 

My Card Recipe:
     Inside Sentiment - Typed and printed from my computer.
     Digital - Ice Cream & Pickles by Saturated Canary
     Stamps - Vintage Labels Just to Say by Lily of the Valley
     Paper - Bazzill White, Flamingo Double Dot by BoBunny and Spring Feast 6x6 Paper Pad by     
          First Edition Paper
     Flowers and Pearl Button - Wild Orchid Crafts
     Metal Die - Tessatina Border by Memory Box, Faus Crochet Border by Die-Namics, Nesting
          Circles & Scallops by Lifestyle Crafts and Heart Swirl & Bon Voyage Foliage by DooHickey
     Inked Edges - Distress Ink Vintage Photo
     Sparkle & Shine - Stickles Star Dust and Glossy Accents by Inkssentials
     My Stash - Ribbon, Pearls, Butterflies, Doily, Hat Pin, Charm & String

Colored in Copics:   Hair - E43, E44, E59          Face - E0000, E00, R01          Eyes - E40, E41
Pink - R20, R22, R24          Yellow - Y00, Y21          Blue - BG70, 0+BG72
Green - G20, G82, YG63          Grey Outline - C00


Thanks for Stopping By...
 
Hugs...
 

Thursday, November 8, 2012

Dot Pumpkins for Thanksgiving


Good Morning!  Today I have finally finished all 20 Dotted White Pumpkins that I will be placing at each Thanksgiving table place setting.  I have made one for each person coming including the grandchildren. 

It has taken me awhile to complete them, which is why I haven't posted anything lately.  Each pumpkin started out green (that's how I purchased them).  I then had to paint each one with 3 coats of white paint to cover the green.  The stems were painted first with black, which I didn't like, then with two coats of a dark brown (much better).  Then I traced on the letters which I had printed out on my computer, painted each dark brown, covered the pumpkin with different sized brown dots then the whole pumpkin was covered with a coat of varnish to make it shine.  I added a bit of Stickles Star Dust to the swirls on each letter and three little gems.  Tied some raffia and ribbon bows, added some leaves, feathers, buttons (for the boys) and flowers (for the girls) and they were finally finished.

So here is a sample of each type.  The one with the flower was made for my daughter and the one with the button is for her boyfriend. 

I really Love them!!!!  I think they are going to look great on our table at Thanksgiving and each person will be able to take theirs home too...


My Crafting Recipe:
From Michaels Craft Store – Small Green Plastic Pumpkins (painted white), Fall Colored Ribbon, White & Dark Brown Paint and Varnish.
From My Stash – Raffia, Fall Leaves, Feathers, String, Jewels & Button
Flower is from Wild Orchid Crafts
The Letters are a font called LD Garbo Script – Printed on paper, traced onto the pumpkin and painted with the Dark Brown Paint
Sparkle is Stickles Star Dust

Thanks for stopping by...
Hugs...Patti


Sunday, October 21, 2012

Candlestick Candy Jars for Halloween


Hi and Good Morning!!!   I Love Pinterest!!!  My girls turned me on to this web site, you can find it at www.pinterest.com, and I just can't get enough of it now!  I can scroll through all the great pictures for hours on end.  I find the best recipes, decorating tips, and diy crafts!

Today my craft is from Pinterest, of course...my eldest daughter actually found this one.  I was at her house visiting for a week and she showed the picture to me.  I decided to make them for her...of course they turned out so great I had to have a set for myself too...lol! 

I looked everywhere for those jars and couldn't find them anywhere.  Then after reading the instructions for making these, I realized the jars they used were from Hobby Lobby.  Off to Hobby Lobby I went!  That was the only place I could find the Jars I wanted, I don't have a Hobby Lobby where I live so luckily there was one not far from my daughters home.  Then off to Michaels, World Market and Target to get the rest of the items I needed!


Here is the finished project...Aren't they great!!! 


Oh yea, at Christmas time you can fill them with little ornaments or Christmas candies, add the Letters JOY in red and a Christmas colored bow!  I'm still trying to think of three letters for Easter, then filling jars with Easter candies and adding a Easter colored bow.  Soooo Cute!

My Project Recipe:
     Candlesticks from World Market...the directions called for separate wooden pieces glued and
          painted but buying these three from World Market was much less time consuming and besides
          I couldn't find all the right wood pieces I needed!
     Jars from Hobby Lobby...they are glued to the candle sticks so they don't fall off
     Ribbon from Michaels
     BOO Letters from Michaels - Letters were white so I painted them black and added glitter to the
          front of each letter.
     Finial is wood purchased on line from Woodworks, Ltd. - www.craftparts.com then painted black
          and glued to top of jar lid.
     Candy Corn is from Target


Thanks so much for stopping by!  Have a Wonderful Day!
Hugs...Patti


Saturday, October 20, 2012

Halloween Diorama


Good Morning Everyone!  Hope you are having a wonderful Saturday morning.

While I was checking out some of my favorite crafting blogs I came across a very cute Halloween Diorama made by Dina Concienne which you can find HERE.  She actually made one using a video project by Jim the Gentleman Crafter which you can find HERE.  Please go and check both of their blogs out, they are incredible crafters.

Anyway I liked them so much I decided I needed to make one for my grandkids.  I bought most of the items from Michaels the craft store.  I used a Tiddly Inks Digital called Trick or Treat Wrens which you can find HERE.  This project was very time consuming to make but I loved crafting it.

The following pictures show you:
     1. The front with the lid on.
     2. Looking from the top down.
     3. Taking the top off and looking inside.
     4. Looking into the hole from the front to see the inside.

Here it is...and oh yea I am going to enter it into the Tiddly Inks weekly challenge "Halloween" which you can find HERE.  Hope you like it!


1. Front

2. Top

3. Looking down inside
4. Looking from front to see the inside


You can see from the picture of the inside that all that is in there is a black xmas tree, a black bird in a cage tag, a battery powered tea light, a black fence and three different sizes of the pumpkin cut from Peek a Boo Bug by Tiddly Inks. I left my floor painted black but you could put paper on it if you wanted. It really looks cute when you turn the big lights off and turn on the tea light inside the diorama.
My Project Recipe:
     Digital - Trick or Treat Wrens and the Pumpkin cut from Peek a Boo Bug both by Tiddly Inks
     Paper - K&Company Halloween Speciality Paper Pack 12x12
     Flowers - Wild Orchid Crafts and Prima
     Paper Punches - Boo Border by EKSuccess and Spider Web by Martha Stewart
     Metal Die - Wrought Iron Fence by Memory Box and Lovely Fence by DooHickey
     Inked Edges - Distress Ink "Black Soot"
     Sparkle & Shine - Stardust by Stickles and Glossy Accents by Inkssentials
     My Stash - Ribbon and crape paper
Miscellaneous Items from Michaels:  Black & Orange Paint, 4" Paper Mache Cylinder (I cut a 3" circle in it using my xacto knife), Tea Light that flickers, Boo & Trick or Treat Ribbons, Small Xmas Tree spray painted black, and Embellishments by Recollections, K&Company and Jolee's Boutique.  I also bought wood pieces to make legs, square box for top and pieces I glued together to make a finial for the top of the box.
I made my own spider web using glue and black glitter.  It's under the flowers...


Thanks for stopping by...
 
Hugs...Patti


Sunday, October 14, 2012

Kaelyn's Shutterfly Book - Front & Back Book Covers

Good Morning!

Today I completed the Front and Back Covers for my Granddaughter's Shutterfly Book.  These pages took me a few days to get right but I love how they turned out. 

I started out with three different cover layouts each using a different digital paper collection.  After numerous adjustments, picture changes and font selections I finally decided on these...

The paper collection is from NitWit called Gratitude Collection by Mary Fran's.  I used this collection for both the front and back covers.  The Layout Template for the cover is Well Loved from Scrapgirls by Melissa Renfro.  All of the embellishments except the staples came from the Gratitude Collection. The back cover was made using a family photo and some of the embellishments from the same collection. The staples, which are in a Collection from Scrapgirls called Jake & Emma by Amanda McGee, were added and then I used a style on them called Embedded which makes them seem sort of pressed into the paper the same as a real staple would look.  The style came from Scrapgirls and is called Embedded 1801 by Melissa Renfro.  I also made the book spine using a font called LD Genteel.  The other fonts I used were LD Garbo, LD Artistic and LuzSans-Book.

So here they are...I really do love how they turned out and when the book is printed they even look better!


Book Front Cover
Book Back Cover

Book Spine


Thanks so much for stopping by today!
Hugs...Patti

Wednesday, October 10, 2012

Kaelyn's First 5 Years 04/2009 & 05/2009

Hi Everyone!  I just finished two more digital scrapbook pages for my Granddaughter's Shutterbug Book. 

The April Easter page was made using a Layout Template Set #70 by Cindy Schneider from Sweet Shoppe Designs.  I also used a paper kit from Sweet Shoppe Designs by Fee Jardine called Life is Good.

The May 4th Birthday page was made using a Layout Template Set #61 also by Cindy Schneider from Sweet Shoppe Designs.  The paper kit is from Sweet Shoppe Designs by Kristin Cronin-Barrow called Happy Go Lucky. 

I really love digital scrapbooking kits because all the items I need for my layouts are included in the kits and I can use them over and over again...isn't that great!  I have also been using the Layout Templates lately because I need to finish so many pages before the end of November.  I want to get this book printed before Christmas so I'm using any and all shortcuts I can find.  Layout Templates help me finish each page so much quicker than if I had to layout a page from scratch, a process which usually takes me a whole week for just one page...haha! 

So here you go, hope you like them... 2 more done with 12 to go...


April 2009 Layout


May 2009 Layout

Thanks for stopping by...
Hugs...Patti

Tuesday, October 9, 2012

Marry Me an Easel Card


Good Afternoon!

Today I have finished my second of three Wedding Cards that I need to complete before November.  This time I made an Easel Card using the Saturated Canary Digital "Marry Me".  I made it for a very good friend of my daughter's who is getting married this weekend.  The bride's colors are black and white so I decided to use white and greys for her card.  I also added just a touch of red and green for the flowers and leaves in the bouquet.  I really love how it turned out...

Hope you like it too...

Front of Card Opened
Inside of Card
Close-Up of Coloring


My Project Recipe:

     Digital - Marry Me by Saturated Canary
     Paper - Bazzill White and Swoon by Little Yellow Bicycle
     Flowers - Wild Orchid Crafts and Prima
     Paper Punches - Dotted Scallop by EKSuccess, Double Scallop by Martha Stewart and
          Butterfly Dreams by DooHickey
     Metal Die - Frilly Square #2 by GoKreate, Swirl #B117 by Cherry Lynn and Amana Circle by
          Memory Box
     Inked Edges - Gray Flannel by Distress Ink
     Sparkle & Shine - Stickles "Star Dust" and Glossy Accents by Inkssentials
     My Stash - Ribbon, Gems, Lace and Pearls

     Sentiments were typed and printed from my computer.

Colored in Copics:  Hair BV23, BV25, BV29      Face E11, E13, E17     Checks RV32    
Lips/Eye Lids E04     Eyes E53, E35     Roses R22, R27     Grey Coo, C01, C02, C03    
Green G82, YG63

Thanks for stopping by...
Hugs...Patti

Wednesday, October 3, 2012

Kaelyn's First 5 Years 02/2009 & 03/2009

Happy Wednesday! 

I'm on a roll today...I finished two more digital layouts for Kaelyn's Shutterbug Book.  I just bought the two Digital Kits that I used today from a web site called Nit Wit Collections.  You can find it HERE.

For the February layout I used Sunshine & Laughter by Mary Fran's and for the March layout I used Slice of Life also by Mary Fran's.  This is my first time trying something from Nit Wit Collections and now I am hooked...haha!  Of course I don't need any more digital paper kits but I just can't help myself...I think I'm a paper addict and I don't care if they are digital or the real thing...I just love paper, LOL!!! 

Soooo here's two more pages done and 14 more to go...

February 2009 Layout
March 2009 Layout


Thanks so much for stopping by!
Hugs...Patti


Tuesday, October 2, 2012

Candy Cane


Good Morning Everyone!

Today I finished my first Christmas card of the season...yeah!!!   I Love Christmas!!!

I used a new rubber stamp made by Krista Smith of Saturated Canary.  Her images are my one of my favorites to color with my Copic Markers.  I own over 60 digital images by her now...WOW!  This image "Candy Cane" is only available as a rubber stamp but I really loved it so I purchased it from the "7 Kids College Fund" web site which can be found HERE.  Isn't she a cutie?

Here it is all colored up and put together!!!  Enjoy...


Front
Side View
Inside
Close-up of Coloring
 

My Project Recipe:
Rubber Stamps - Candy Cane by Saturated Canary, Floral Flourish by Paper Inspirations, Sparkling
     Season by The Greeting Farm and Christmas Sentiment Tags by Lily of the Valley
Paper - Festive 6x6 Bundle by Authentique, Brown Kraft and Bazzil White
Flowers - Wild Orchid Crafts
Paper Punches - Dotted Scallop by EKSuccess
Metal Die - Labels Eight & Label Eight Decorative by Spellbinders, Frosty Border, Snowflake
     Bianca & Snowflake Corner by Memory Box, and Peony Petals by DooHickey
Inked Edges - Vintage Photo Distress Ink
Sparkle & Shine - Stickles Stardust, White Opal Liquid Pearls, and Glossy Accents by Inkssentials
My Stash - Ribbon, Button, Half Pearls, and String

Colored in Copics:  Hair E43, E44, E59      Face E0000, E00, E11, RV00      Eyes B41, B12
Red R22, R24, R27, R39      Brown Bag E40, E43      Green G21, YG03      Grey No, N1, N2

Thanks for stopping by...
Hugs...Patti

Tuesday, September 18, 2012

Marry Me - Bridal Shower Drawer Box

Good Morning Everyone!

I have three Weddings and a Bridal Shower to attend between now and November, so I'm finally starting to make the cards for them.  The first one I completed is for my brothers fiance's Bridal Shower.  It is a Drawer Box with an Easel Card on the top.  I'm going to put little marriage inspiration sayings in each drawer (there are four drawers) along with a gift card in each.  I used a tutorial from the LaLa Land Blog by Nicole Zarra to make the box.  You can find the tutorial HERE.

I have used a Saturated Canary Digital called Marry Me and this project fits the requirements for the Saturated Canary Challenge #26...B's.  I needed to use at least two items that starts with B...my items are Bride, Butterflies, Box and Bows.

Here it is!  I hope you like it...


Card Opened

Front of Card
Card Message


My Project Recipe:

     Digital - Marry Me by Saturated Canary
     Stamps - Grunge Flourish Hearts by Stempelglede
     Paper - Rondelle 6x6 paper pack by Prima and Bazzill Greys
     Flowers - Wild Orchid Crafts and Recollections
     Pearl Flowers - Wedding area at Michaels Craft Store
     Paper Punches - Branch by Martha Stewart and Dotted Scallop by EK Success
     Metal Die - Butterflies by Cheryl Lynn and DooHickey, Amana Circle & Corner Bow by
          Memory Box, Heart Swirl by DooHickey, Nesting Doily Rectangle by Lifestyle Crafts, and
          Decorative Duo by Dienamics
     Inked Edges - Momento Ink in Grey Flannel
     Sparkle & Shine - Stickles Stardust and Glossy Accents by Inkssentials
     My Stash - Ribbon, Pearls and Pearl Brads
     Miscellaneous - Shabby Chic Treasure Heart by Prima, Pearl Swirls by Zva Creative.

I made the swirly things by the flowers, using white floral wire wrapped around a small brush handle, Glossy Accents as the glue and Diamond Dust.  Bev Rochester showed how she made these on her blog All Things I Love.  You can find it HERE.  She used German Glass Glitter but I didn't have any of that so I used the Diamond Dust instead.

Colored in Copics:     Hair E43, E44, E59     Face E0000, E00, RV00     Eyes B41, B12
Dress C00, C1, C3     Flowers R81, R83, R85     Green G20, G82, YG63

Thanks so much for stopping by!
Hugs...Patti

Friday, September 14, 2012

Kaelyn's First 5 Years 01/2009

Good Morning Everyone!

Today I finished a second page for my Granddaughter Kaelyn's Shutterfly book.  Only sixteen more to go...

This layout is about our family vacation to Disney World in Orlando Florida.  Grandpa set up a special date for Kaelyn to be transformed into any Disney Princess she wanted.  She picked Bell from Beauty and the Beast.  She was so excited to have it done until the Disney lady started working on her.  See the top circle...that's her evil eye she was using the whole time!!!  She just didn't like that lady touching her at all but...she ended up having her nails, makeup and hair done and was very, very happy when it was all finished!  She looked sooooo cute, just like a Princess!

Enjoy...


My Digital Layout Recipe:
     I started with a Layers template by Darcy Baldwin at Sweet Shoppe Designs.  Then added papers and elements from the "These Days" collection by Kristin Barrow also from Sweet Shoppe Designs.
I added styles to the Princess Kaelyn and Quote box.  Drop Shadows were added to everything too.

Thanks for stopping by!
Hugs...Patti


Thursday, September 13, 2012

Kaelyn's First 5 Years 12/2008

Good Morning!  Today I am going to share something new...

For years, before I started stamping and making cards, I worked on Digital Scrapbooking. I found a web store called Scrap Girls (find here) and was hooked! They have the best tutorials and lots of fabulous papers, elements, fonts, styles...well you get the point!  Then I started finding more web stores for digital scrapbooking products, A Cherry on Top (find here), Sweet Shoppe Designs (find here), Shabby Princess (find here) and Scrapbook Elements (find here).  These were my favorite places to shop but there are so many more you can find now.  It became my passion for many years, yes I was obsessed and I now own thousands of digital products!  I learned how to use Adobe Photoshop for scrapbooking and the rest is history...haha

About two or maybe three years ago I started a Shutterfly (find here) book for my Granddaughter Kaelyn.  It was supposed to contain a scrapbook page for each month of her first five years!  Well I never finished it because I started making cards instead of spending time on Kaelyn's book...so today I decided to get back to work on it so I can give it to her for Christmas this year.  I have 18 pages to go to be finished.

 Here is the one I completed today.  The layout design is a pre-made design called Winter Cheer by Lliella Designs at Sweet Shoppe Designs. All I had to do to this one was add the photos, some text on the round tag, add a few more embellishments and some journaling. This was a super easy one to get me started again!

Enjoy!


My Digital Layout Recipe:
     Winter Cheer Quick Page Set by Lliella Designs at Sweet Shoppe Designs
     Fonts - Old English Text, LD Garbo and LD Flutter
     Additional Embellishments - White Frame, Buttons, Pink and Silver Flower, Present and Leaves
          which all came from the Digital Set also called Winter Cheer by Lliella Designs. 


Thanks for stopping by!
Hugs...Patti