Showing posts with label LOTV Sentiments. Show all posts

Thursday, January 3, 2013

James Bear Deck the Halls

Good Morning!  I've finished another "late" Christmas card today...I'm still making them for next Christmas!  This one is using the James Bear Deck the Halls stamp from Lili of the Valley, you can find them HERE.  The card shape is made using a large die from Go Kreate which you can find HERE.  I love their dies because they make die sets large enough for a nice 6x6 card, but you do need to have a Grand Calibur by Spellbinders to cut them out because the dies are to large for the Cuttlebug.

I am still using the Homemade Holidays 6x6 paper pack...I have enough paper left for one more card I think!!!  Amazingly I was able to make 5 different cards with this one 6x6 paper pack.  I LOVE these paper packs because they are already color coordinated for me and some, like this one, have little card tags included.  So much faster than trying to decide on my own papers one by one...

Here is my card for today...enjoy...

Front of card

Inside the card

Close-up of Copic Coloring...Bear is done with dots instead of strokes!

My Card Recipe:
     Stamps - James Bear Deck the Halls by Lili of the Valley, Bright Spirits by Verve and Christmas
          Mini Icon Tags & Christmas Sentiment Tags by Lili of the Valley
     Paper - Bazzill White & Read, 6x6 Paper Pad Handmade Holiday by Simple Stories
     Flowers - Wild Orchid Crafts & Petaloo
     Paper Punches - Snowflakes and Garden Trellis by Martha Stewart, Leafy Branch by CCDesigns
           and Vintage Leaf by DooHickey
     Metal Die - Label Stacklets 2 by Taylored Dies and Nesting Circles & Nesting Scalloped Circles
          by Lifestyle Crafts.  The card shape is made using a large Frilly Square #2 by Go Kreate.
     Inked Edges - Distress Ink Vintage Photo
     Sparkle & Shine - Stickles Star Dust and Glossy Accents by Inkssentials
     My Stash - Ribbon and Pearls

Colored in Copics:  Bear - Dotted E30, E31, E33, E35     Blue - BG70+BG18, BG18
Red - R24, R27, R37, R39     Yellow - YR20, Y21, Y11     Green - YG91, YG93, YG95, YG97
Grey Shading - C00

Thanks so much for stopping by...
Have a Great Day!
Hugs...


Friday, December 21, 2012

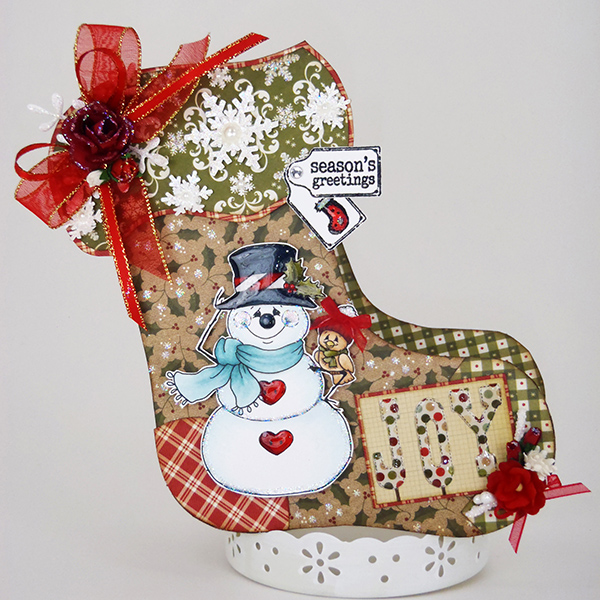
Christmas Stocking Card

Good Evening to you all!

I've been so busy decorating, shopping, wrapping gifts, planning Christmas meals, playing Dragon Vale (oh I know that doesn't have anything to do with Christmas but it is so much fun to play) and browsing through Pinterest for Christmas ideas, that I haven't had much time for crafting...

I had originally planned on making Christmas Cards for family and friends this year too, but well... I've run out of time so maybe next year hahaha.  I did however find some time today to finish a little Christmas Stocking Card that I will save for next year.  I was inspired by a card my mother sent us.  It had the cutest Christmas stocking on the front of it.  I had bought some cut out stockings, which were just the right size; at our local Michael's Craft Store awhile back so I used one as a stencil for cutting out my card.  I cut a heal and toe piece and a cuff for the top of the stocking.  I also cut out a bunch of snowflakes and covered them with Star Dust Stickles to make them shine.  I layered large and small snowflakes together, added a pearl to the middle and attached them to the stocking cuff.  The cuff paper already had snowflakes on it so I just added the ones I made onto those.  The Joy tag is a pre-printed tag from the 6x6 paper pack I used.  I don't know if you can tell or not, but I added Glossy Accents to the letters to make them stand out.  I haven't put anything on the inside of my card yet, I'll probably wait to do that until I know who I will be giving it to.

Soooooo here it is...enjoy!

Front

Peek of Inside

My Card Recipe:
     Digital - Snowman Top O'The Mornin by Whimsy Stamps
     Stamps - Christmas Mini Icon Tags & Christmas Sentiment Tags by Lily of the Valley
     Paper - Bazzill White & Handmade Holiday 6x6 paper pad by simple Stories
     Flowers - Wild Orchid Crafts
     Paper Punches - Alpine & Aspen Snowflakes by Martha Stewart
     Metal Die - Snowflake by DooHickey
     Inked Edges - Distress Ink Vintage Photo
     Sparkle & Shine - Stickles Star Dust and Glossy Accents by Inkssentials
     My Stash - Ribbon & Pearls

Colored in Copics:  Snowman BG0000, C00     Cheeks RV0000, RV00     Top Hat C5, C7, C9
Blue BG18 + 0 Blender     Red R24, R27, R39     Brown Bird E30, E31, E33    
Yellow Beak Y21, YR24     Green YG93, YG95, YG97     Grey Shading C00


Thanks for stopping by...
 
Hugs...


Monday, November 19, 2012

Ice Cream & Pickles - Baby Shower Card


Good Morning!  It's a beautiful Monday afternoon and I have just finished a cute card for my Niece's Baby shower.  She is having a little girl so I made the card quite girlie.  I really love the Saturated Canary Digital Ice Cream & Pickles.  You can find the website on my side bar, just double click and it will go directly to the Saturated Canary Shoppe.

Hope you're having a wonderful Monday...here is my card, Enjoy!!!


Front
 
Inside
 

My Card Recipe:
     Inside Sentiment - Typed and printed from my computer.
     Digital - Ice Cream & Pickles by Saturated Canary
     Stamps - Vintage Labels Just to Say by Lily of the Valley
     Paper - Bazzill White, Flamingo Double Dot by BoBunny and Spring Feast 6x6 Paper Pad by     
          First Edition Paper
     Flowers and Pearl Button - Wild Orchid Crafts
     Metal Die - Tessatina Border by Memory Box, Faus Crochet Border by Die-Namics, Nesting
          Circles & Scallops by Lifestyle Crafts and Heart Swirl & Bon Voyage Foliage by DooHickey
     Inked Edges - Distress Ink Vintage Photo
     Sparkle & Shine - Stickles Star Dust and Glossy Accents by Inkssentials
     My Stash - Ribbon, Pearls, Butterflies, Doily, Hat Pin, Charm & String

Colored in Copics:   Hair - E43, E44, E59          Face - E0000, E00, R01          Eyes - E40, E41
Pink - R20, R22, R24          Yellow - Y00, Y21          Blue - BG70, 0+BG72
Green - G20, G82, YG63          Grey Outline - C00


Thanks for Stopping By...
 
Hugs...
 

Tuesday, October 2, 2012

Candy Cane


Good Morning Everyone!

Today I finished my first Christmas card of the season...yeah!!!   I Love Christmas!!!

I used a new rubber stamp made by Krista Smith of Saturated Canary.  Her images are my one of my favorites to color with my Copic Markers.  I own over 60 digital images by her now...WOW!  This image "Candy Cane" is only available as a rubber stamp but I really loved it so I purchased it from the "7 Kids College Fund" web site which can be found HERE.  Isn't she a cutie?

Here it is all colored up and put together!!!  Enjoy...


Front
Side View
Inside
Close-up of Coloring
 

My Project Recipe:
Rubber Stamps - Candy Cane by Saturated Canary, Floral Flourish by Paper Inspirations, Sparkling
     Season by The Greeting Farm and Christmas Sentiment Tags by Lily of the Valley
Paper - Festive 6x6 Bundle by Authentique, Brown Kraft and Bazzil White
Flowers - Wild Orchid Crafts
Paper Punches - Dotted Scallop by EKSuccess
Metal Die - Labels Eight & Label Eight Decorative by Spellbinders, Frosty Border, Snowflake
     Bianca & Snowflake Corner by Memory Box, and Peony Petals by DooHickey
Inked Edges - Vintage Photo Distress Ink
Sparkle & Shine - Stickles Stardust, White Opal Liquid Pearls, and Glossy Accents by Inkssentials
My Stash - Ribbon, Button, Half Pearls, and String

Colored in Copics:  Hair E43, E44, E59      Face E0000, E00, E11, RV00      Eyes B41, B12
Red R22, R24, R27, R39      Brown Bag E40, E43      Green G21, YG03      Grey No, N1, N2

Thanks for stopping by...
Hugs...Patti