Showing posts with label Halloween. Show all posts

Saturday, November 2, 2013

Halloween Witches Boot

I have the cutest Witches Boot to share today. In August I joined a kit club called "Paper Phenomenon Holiday Kit Club" where I purchased a group of holiday kits.  Along with the Holiday kits, which includes everything you need to complete it including videos and pdf's, there is also a "bonus kit" that you get that is only pdf instructions and videos.  I am having the best fun with these kits!!!

This Halloween Witches Boot is the October Holiday Kit Club item.  I had so much fun making it...this one was not made using the  papers from the kit club because I just couldn't wait after I viewed the videos on the web site...so I used some paper packs from last year, a few newly purchased papers and a bunch of new embellishments from this years selection.

I'm going to put all of the photos from my Children and my Grandchildren's Halloweens into it!  It will really be a beautiful holiday show piece for many years to come...

Here it is, the Witches Boot with the Album nestled inside of it...enjoy!


Side 1 of Boot...can you see the lacing of the ribbon up the front of the boot?


Side 2 of Boot


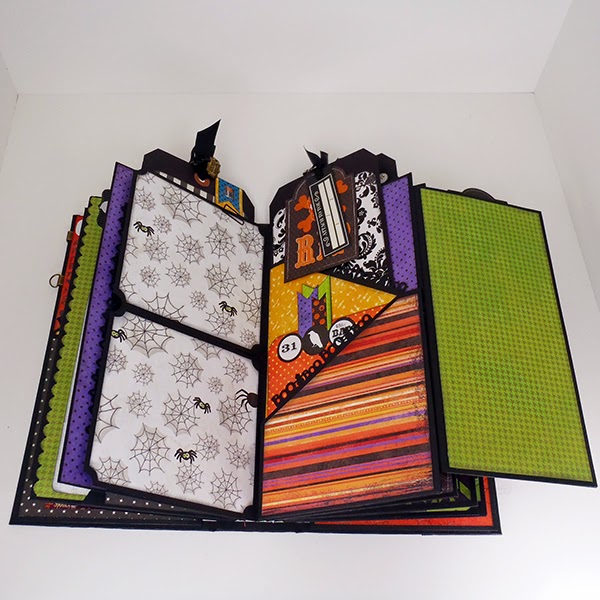
Now here are the pictures of the Album, and all of the pages, that you see inside of the boot above...as you can tell from the photos there are lots of interactive pages to open and tags to pull out.  I am sure I will be able to fit tons of photos into it, but I may have to remove some of the interactive stuff because adding the photos will probably make it to bulky to fit back into the boot... :0(   

I don't know for sure...we'll see...
This is the Album pulled from the Witches Boot and the rest of the photos are of the
different pages inside...


My Project Recipe:

Papers and Embellishments that were part of the paper collections - Black Bazzill Cardstock, Fright Delight by Bo Bunny, Thirth One, by Pebbles, Happy Haunting by Graphic 45, Arsnic & Lace by Bazzill, 2012 K& Company Halloween Paper Pack, Trick or Treat by Bella Blvd and Thrilling by Authentique

Embellishments - Scarecrows on boot by Jolee's Boputique, #31 on boot by Theresa Collins Masquerade Party, Toe Tags by ? and Chalkboard Stickers by Pebbles

Misc Stickers - Fright Delight by BoBunny, Fancy Firlls by BBP and Halloween Parade by Doodlebug Designs

Paper Punches by Martha Stewart - Traditional Scallop, Boo, Cats, Spider Web, Spider and the Spider Web Circle Edge Punch

Paper Punch by EK Success - Scallop

WeR Memory Keepers Corner Punches - 1/4 Round, Photo and Stub

From My Stash - Ribbon, Brads, Charms, and Chain


Thanks so much for stopping by today...


Hugs...


Wednesday, October 23, 2013

Boo! Layout

Good Morning...today I am going to show you the second project my sister and I did...

I had recently watched a YouTube video by Limor Webber on making her Boo! multi-media scrapbook page layout.  You can find it HERE!  It was the perfect way for us to display photos of our grandchildren's Halloween Costumes that they will be wearing this year.  It was very fun to do except for the cheese cloth webs...lol!  They seem so easy to do but wow, we had quite a time getting it to look like a web verses a glob of cheese cloth...but I think we finally got it and here is the result.

Enjoy...


Layout Recipe...
Papers by Prima - Engraver and Sunrise/Sunset Collections
Black Bazzill card stock
12 x 12 piece of Heavy Chipboard for backing the layout as we are putting them inside a display case/frame
Distress Paint - Black Soot (used to color BOO!)
BOO! Letters - Pebbles ABC Stickers
Clocks and Gears - Prima Mechanicals
Flowers - Prima and Recollections
Ruler - Colored wood with Engraver Paper Ruler
Chipboard covered with Engraver Paper flower Paper cut 1 3/4" x 1 3/4"
Metal Die - Tim Holtz Spider Web by Sizzex
Metal Flowers by Prima
White Inkssentials Pen
Black Leaves from the Prima Chalkboard Collection
Cheese Cloth
Black Lace
Prima Chalk Inks - Rusty Keys, Old Road and Black Coal


Thanks for stopping by...

Hugs...


Saturday, November 24, 2012

Fall Pumpkins & Halloween Trick or Treat Bags


Today I have one last post for the Fall and Halloween projects I made. 

The first is two different sized plastic pumpkins painted white.  I attached lots of swirls in different shapes and styles, then added a pretty flower in the center.  They looked great on my entry table through out the fall season.

The second is the Halloween Trick or Treat Bags I made for the neighborhood kids.

Here they are... enjoy...


Large 9" Pumpkin
Small 6" Pumpkin

Trick or Treat Bag


My Crafting Recipe for Pumpkins:

The Pumpkins were purchased from Michaels and painted white then varnished.  Stems were painted brown then varnished.  The pumpkins are two different sizes...9" wide and 6" wide.

The swirls were made by Kaiser Craft, Recollections, Prima and Zva Creative.  I purchased them from several different craft stores in my area.

The flowers are by Recollections from Michaels Craft Store.


My Crafting Recipe for Trick or Treat Bags:

Black Bazzill card stock paper punched along one side using Martha Stewart's Spiderweb punch.  The purple, green printed papers & cut out pumpkins are from a 12x12 paper pack by K&Company called Halloween Designer Paper.  The Words are cut from a 12x12 paper pack by Martha Stewart called Carnival.

The Cat Sticker is by Recollections.  I used many different types of stickers and all were from Recollections which I purchased from Michaels Craft Store.

The colored papers were punched using Nesting Scallops by Lifestyle Crafts and the purple paper shape is Labels Four by Spellbinders.

The bag is purchased from Michaels Craft Store and then filled with different candies from the grocery store.


Thanks for stopping by...
 
Hugs...


Sunday, October 21, 2012

Candlestick Candy Jars for Halloween


Hi and Good Morning!!!   I Love Pinterest!!!  My girls turned me on to this web site, you can find it at www.pinterest.com, and I just can't get enough of it now!  I can scroll through all the great pictures for hours on end.  I find the best recipes, decorating tips, and diy crafts!

Today my craft is from Pinterest, of course...my eldest daughter actually found this one.  I was at her house visiting for a week and she showed the picture to me.  I decided to make them for her...of course they turned out so great I had to have a set for myself too...lol! 

I looked everywhere for those jars and couldn't find them anywhere.  Then after reading the instructions for making these, I realized the jars they used were from Hobby Lobby.  Off to Hobby Lobby I went!  That was the only place I could find the Jars I wanted, I don't have a Hobby Lobby where I live so luckily there was one not far from my daughters home.  Then off to Michaels, World Market and Target to get the rest of the items I needed!


Here is the finished project...Aren't they great!!! 


Oh yea, at Christmas time you can fill them with little ornaments or Christmas candies, add the Letters JOY in red and a Christmas colored bow!  I'm still trying to think of three letters for Easter, then filling jars with Easter candies and adding a Easter colored bow.  Soooo Cute!

My Project Recipe:
     Candlesticks from World Market...the directions called for separate wooden pieces glued and
          painted but buying these three from World Market was much less time consuming and besides
          I couldn't find all the right wood pieces I needed!
     Jars from Hobby Lobby...they are glued to the candle sticks so they don't fall off
     Ribbon from Michaels
     BOO Letters from Michaels - Letters were white so I painted them black and added glitter to the
          front of each letter.
     Finial is wood purchased on line from Woodworks, Ltd. - www.craftparts.com then painted black
          and glued to top of jar lid.
     Candy Corn is from Target


Thanks so much for stopping by!  Have a Wonderful Day!
Hugs...Patti