Monday, April 29, 2013

True Friend with Violet Vintage


Happy Monday Friends...today I'm going to share a card that I made using one of my new Saturated Canary Digitals "Violet Vintage".  I just Love her glasses and that cute fringed purse she is carrying.

It's the first time I made a step card and it was quite challenging because I didn't have a pattern to follow.  I saw a picture of one on a blog but couldn't find a pattern so I had to make my own.  After two failed attempts, those fold measurements were very tricky, I came up with this final version.

I also had lots of fun playing with a new embossing powder by Stampendous called Fran-tage Shabby Pink and Aged Ivory.  I was Fran-tageing everything I could find...haha!   I really love how my circle paper clip, mini clothespin and wooden mini butterflies, turned out...sooooo cute!!!  A couple of days ago I received a bunch of new rubber stamps from Whimsy Stamps so I included three of them in my card layout too...

So here it is...hope you like it!
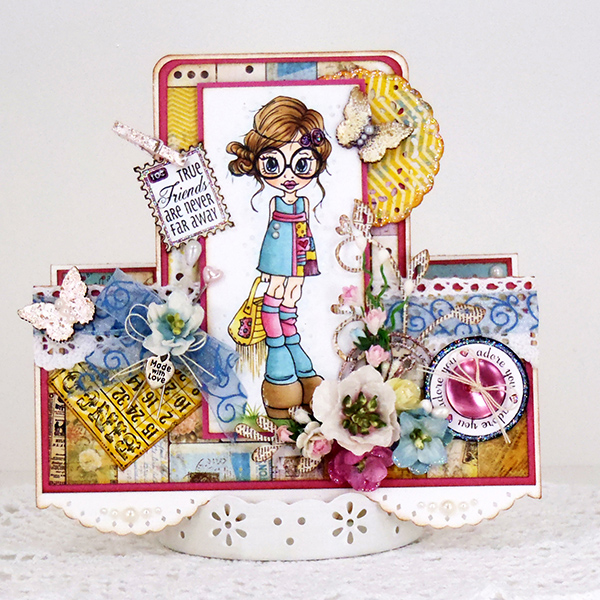
There are actually three scallops along the bottom!

Side View where you can see the step in the card!

My Project Recipe:
     Digital - Violet Vintage by Saturated Canary
     Stamps - Friends & Family Mini Postage, Everyday Button Sentiments and Mini Backgrounds all by
          Whimsy Stamps
     Paper - Bazzill White and Cest La Vie Collection by BoBunny
     Flowers - Petaloo
     Paper Punches - Diamond Lace
     Metal Die - French Pastry Tiny Doily by Cheery Lane, Vintage Leaf & Heart Swirl by DooHickey
     Inked Edges - Distress Ink vintage Photo
     Sparkle & Shine - Stickles Star Dust and Glossy Accents by Inkssentials
     My Stash - Ribbon, Pearls, Charm, String, Button & Lace

     Miscellaneous items - Mini Clothespin, Life Time Paper Clip & Wooden Butterflies are embossed
          using VersaMark Ink Pad and Stampendous Fran-tage Shabby Pink & Aged Ivory.

Colored in Copics - Face E0000, E00, R01          Eyes B41, B12          Hair E31, E55, E57
Pink R81, R83, R85          Yellow Y11, Y21, Y32          Green Grass G20, G21, G82, YG61
Blue G52, BG70, BG72          Shoes E42, E43, E55          Dotted Outline B0000, C00, 0 Blender


Thanks for stopping by...

Hugs...


Friday, April 19, 2013

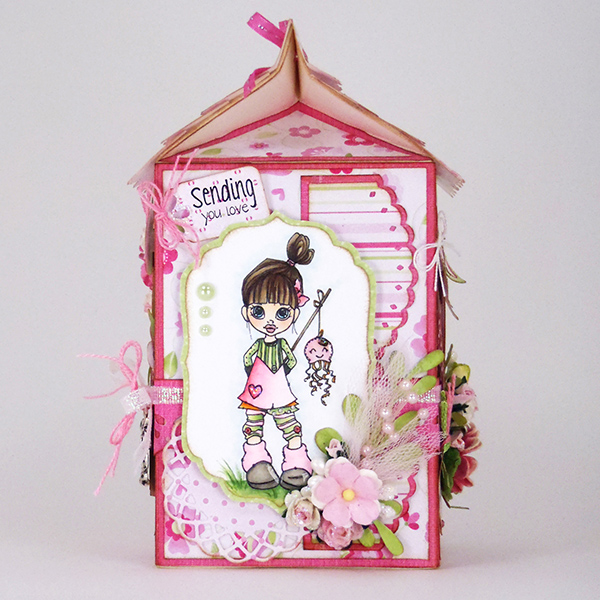
Milk Carton - Saturated Canary Challenge #41

Hi Everyone and Happy Friday!

Today I'm sharing a Milk Carton Project that I am going to enter in the current Saturated Canary Challenge #41, which you can find HERE.

I found this template for the Milk Carton at Ruthann Zaroff's web site, which you can find HERE.  The template can be made into any size you want...mine is made using a 12" x 12" sheet of White Bazzill Cardstock.  The beginning size I cut out is 8" x 11 1/2".  With the 11 1/2" side at the top of the Score Board, I scored at 2 3/4", 5 1/2", 8 1/4" & 11".  Then turning the paper so that the scored 1/2" tab is at the bottom, I scored at 2", 6" & 7 1/2".  When you see the template this should all make sense to you.  You will also see that there are a couple more places to score and fold to actually make the finished project look like a Milk Carton!

I started this project months ago...  I really became motivated to finish it when I saw that the new Saturated Canary Challenge was "Anything Goes" which is perfect for my Milk Carton Project.  I had already finished one side using the Saturated Canary Digital "Roses are Red, Violets are Blue" before setting it aside.  This week I worked to finish up the other three sides using a different Saturated Canary Digital for each one.

I'm going to use this Milk Carton as a gift card holder.  All I need to do is untie the bow on top, open the carton, place some confetti and a gift card inside, and then retie the bow and the gift will be ready for me to give.  I really love how it turned out, hope you do too!

Enjoy!


Side 1 - Front

Side 2

Side 3

Side 4

Close-up of Top - Untie this bow to open Milk Carton


My Project Recipe:
     Digital - All are by Saturated Canary - Side 1: Roses are Red, Violets are Blue
          Side 2: Jelly Bug          Side 3: Sabrina          Side 4: Pint Sized Love
     Stamps - Many Mints Occasions by Taylored Expressions
     Paper - Bazzill White and Digital Papers "Good Hare Day" by NitWit Collections
     Flowers - Wild Orchid Crafts
     Paper Punches - Botanical Scallop by Martha Stewart and Diamond Lace & Scalloped Scallop by
          EK Success
     Metal Die - Banner by LaLaLand, French Pastry Tiny Doily by Cheery Lynn, Mini Tags by Taylored
          Expressions, Photo Corner by Quickutz, Leafy Branch by CCDesigns, Delicate Fern & Ringed
          Buckle by Memory Box and Petite Oval Small, Petite Oval Scalloped Small, Labels Ten & Labels
          Four by Spellbinders
     Inked Edges - Distress Ink Vintage Photo
     Sparkle & Shine - Stickles Star Dust and Glossy Accents by Inkssentials
     My Stash - Ribbon, String, Gems, Feathers and charms

Colored in Copics:  
Face E0000, E00, R01          Eyes B41, B12      
Pink RV000, RV10, RV13
Green on Dresses YG000, G20, G40          Green Grass/Leaves G21, YG03
Brown Shoes E41, E42, E43        
Orange YG32, YG35        
Hair - Red Brown Dark E15, E17, E27
Hair - Dark Brown E43, E44, E59
Hair - Light Brown E50, E31, E25
Hair - Blond E50, E53, E55
Outline Shadow - Dotted using B0000, C00 and Blender Pen 0


Thanks so much for stopping by...

See you next time...

Hugs...


Wednesday, April 17, 2013

Fairy Wishes Birthday


Happy Wednesday!  I have a card to share today that uses the rubber stamp, Fairy Wishes by Saturated Canary.  I don't usually buy her rubber stamps because she has fabulous digital's and they are so much easier to store, but I really liked this one so I bought it.  The layout was copied from one I saw on a web site at jenines-cardideas.blogspot.com.  I really loved the pocket with the tags...my layout has a few differences but the basic design came from Jenine.  She is such a wonderful card maker so pop on over to her web site and check out her designs.


Front

Inside

Side View

My Card Recipe:
     Stamps - Fairy Wishes by Saturated Canary, Happy Birthday by Magnolia, Just to Say Vintage
          Sentiments & Grunge Corners by LOTV and Grunge Flourish Hearts by Stempelglede
     Paper - Kraft Brown and Secret Garden by Graphic 45
     Flowers - Wild Orchid Crafts
     Metal Die - Scalloped Tag, Bloomy Tag & Heart Swirl by DooHickey, 6002/0134 by Joy Crafts
     Inked Edges - distress Ink Vintage Photo
     Sparkle & Shine - Stickles Star Dust and Glossy Accents by Inkssentials
     Wish Tag by Tim Holtz
     My Stash - Ribbon, String, Lace, Gems, Hat Pin, Metal Corner and Butterfly Paper Clip

Colored in Copics:  Skin E0000, E00, R01          Purple BV60, BV63, BV02          Wings Y0000, Y000
Green G40, YG11, YG61, YG63          Star Y11, Y32, Y35          Hair E50, E31, E25
Outline is Dotted using BV20, BV23, BV20/23 -- Blended in circles with the 0 Blender Pen


Thanks for stopping by...

Hugs...


Saturday, April 13, 2013

Craft Caddy #2

Hi and Good Morning!  Happy Saturday too!

Today I am posting another Craft Caddy that I made.  When my youngest daughter saw my first one she wanted to take it home...no I said it took me too long to make and I love it!!!  Well after giving it some thought I decided to make a second one and give it to her as a surprise...

The Craft Caddy is by Kaiser Craft and is covered using Prima Papers and Embellishments from the Fairy Rhymes Collection.  The Caddy comes in pieces and is unpainted.  I first painted all of the pieces using Americana Warm White, which took three coats to cover completely.  Then I used One Step Crackle by Deco Art and when dry I stained it using Staining Antiquing Medium by Americana mixed with Martha Stewart Lake Fog, which is kind of a taupe color.  After I finished all of this I sealed every piece using Krylon Satin Finish...unfortunately I dropped the bottom piece and chipped the corner.  When I tried to repaint it, crackle it and stain it, the broken corner looked like a different color so to hide that piece I covered the bottom piece with paper and you can't even tell it has a booboo. Haha!!!

I also used Prima Butterflies, Brads and Flowers.  Some of the other embellishments were from Recollections, BoBunny, The Paper Studio, Maya Road, Pink Paislee, Zuma Crafts, Little Yellow Bicycle, Petaloo, Art Mind Wood Tags, Tim Holtz, Ranger and lots of Lace, Ribbon, Gems, Hat Pins, Charms, & Tulle from my stash.  As you can see from the pictures there are so many embellishments I got lost keeping track which is why I don't have everything listed separately...it was just too much to keep track of!  If you decide to make one for yourself, you can just use anything you have available for the decorations...it's all up to you and what you like!

Here are the pictures of it... my daughter really liked the first one so I think I'll keep this one and give the other to her.  My post before this one is the original Craft Caddy that I made, if you want to take a look just scroll down to the other post!

Side 1

End 1

End 2

Side 2

Top View


Thanks so much for stopping by...

See you again soon...

Hugs...

Tuesday, April 2, 2013

Craft Caddy

Hi and Happy belated Easter!  Hope you all had a wonderful day.  I had a great day with my family.  We enjoyed three Easter egg hunts for the grand kids and a great meal.  It was so fun and the kids had a ball!  Our grand kids were here for the week prior to Easter so I didn't get any crafting done, but now that they have gone home, I finished up my Craft Caddy which I had started at a class I took at my favorite craft store the Saturday before the kids came.  I am going to use it on my desk to hold my crafting tools... Scissors, Glue, Sparkles, Gems, Pearls, Flowers, currently in use Copics, etc...you get the point.  The Caddy has four Drawers, two spaces for storage on the top and four spaces for storage on the sides.  Best of all it spins so I have great access to every area of storage.  I really love it!

It was made using a Craft Caddy Kit by Kaiser Craft, Romantic Novel Papers from Prima and lots of great odds and ends as decorations.  The Craft Caddy comes in pieces and unpainted.  I first painted all of the pieces using Americana Warm White, which took three coats to cover completely.  Then I used One Step Crackle by Deco Art and when dry I stained it using Staining Antiquing Medium by Americana mixed with Martha Stewart Lake Fog, which is kind of a taupe color.  Finally I sprayed all of the surfaces with Krylon Satin Finish to keep the stain from rubbing off.  The Romantic Novel Papers were added using Glue n Seal by Ranger.  All embellishments were added using Crafter's Pick The Ultimate thick glue.  Unfortunately I did not keep track of everything I used for decoration but here are a few that I can remember...

BoBunny Trinkets, Chipboard Pieces & Brads
Pink Paisley Butterfly Garden Charms
Tim Holtz Locket Keys, Game Spinners, Hanger Clips
Prima Romantic Novel Embellishments
Lace, Pearls and Clips came from my stash and some of the things came in the class kit
Drawer Handles were by Prima I think

Here are some pictures of it before I loaded it with my craft stuff...

Front 1 with two drawers

Side 1 with two slots

Front 2 with two drawers

Side 2 with two slots


Thanks so much for stopping by...

Hugs...