Wednesday, November 6, 2013

Game Night

My husband and I are celebrating our 30th Wedding Anniversary this month.  I decided I was going to print a bunch of photos of myself & Ken from 1983, when we were married, up until now and use them in a scrapbook project before the end of the year.  It's been really fun to see how much we have changed over the years.

Today I am going to share my Paper Phenomenon October Kit Club Project "Game Night" which I finished yesterday.  When Kathy Orta, the owner/creator of the Paper Phenomenon Kit Club, previewed her October Kit Project I knew that was where I was going to showcase 30 years of our family.  I didn't even wait for my kit from her to arrive...instead I pulled out a paper collection which I had received from my "September Swirlydoo Kit Club" kit and used all of the photos I printed of Ken and I, along with enough family vacation & special family event photos to be able to complete the project.  I used Kathy's preliminary cutting guide and YouTube Videos she had made for us to help me along with this project.  Then when she finished up the remaining videos and completed the tutorial I was able to finish the project and share it with you!

It's called a Game Board but really it's just a very unique way for displaying our family photos.  I did add the monopoly money, game pieces and a timer, as per Kathy's instructions, but it's not really a game to play it's a scrapbook!  As you can see from the following pictures I made a game board, a box to keep it in and inside the box I made a game piece holder, a spinner and a tray.  When you lift the tray out there is a small storage area under it which I will be able to place the left over photos that I had printed but didn't use on the board.

The paper collection is from Hot off the Press called Stolen Moments and I also used Mixed Media 101 Travel Collage Pack by Splash of Color.

Here it is...enjoy!

This is the top of the Game Board Box.  I decorated it with Prima Flowers
and a Prima Butterfly.

This is the Game Board Box, the lid removed, with the folded Game Board nestled inside.

When you remove the Game Board you can see the tray and game piece holder.
You can also see the game pieces, the dice, the timer, play money and the cute clock spinner I made!
When the spinner is removed there are slots where you can separate the money if you want
to make it seem as though you are playing a game.

This is the Game Board opened to display 30 years of our family...
Each photo is mounted on the top of a pocket which is holding a tag that when you
pull it out there is an additional photo and some journaling.  It dates from November 1983 until
the summer of this year 2013!

Happy Anniversary to us...it's been an amazing 30 years!


Thanks for stopping by...

Hugs...


Saturday, November 2, 2013

Halloween Witches Boot

I have the cutest Witches Boot to share today. In August I joined a kit club called "Paper Phenomenon Holiday Kit Club" where I purchased a group of holiday kits.  Along with the Holiday kits, which includes everything you need to complete it including videos and pdf's, there is also a "bonus kit" that you get that is only pdf instructions and videos.  I am having the best fun with these kits!!!

This Halloween Witches Boot is the October Holiday Kit Club item.  I had so much fun making it...this one was not made using the  papers from the kit club because I just couldn't wait after I viewed the videos on the web site...so I used some paper packs from last year, a few newly purchased papers and a bunch of new embellishments from this years selection.

I'm going to put all of the photos from my Children and my Grandchildren's Halloweens into it!  It will really be a beautiful holiday show piece for many years to come...

Here it is, the Witches Boot with the Album nestled inside of it...enjoy!


Side 1 of Boot...can you see the lacing of the ribbon up the front of the boot?


Side 2 of Boot


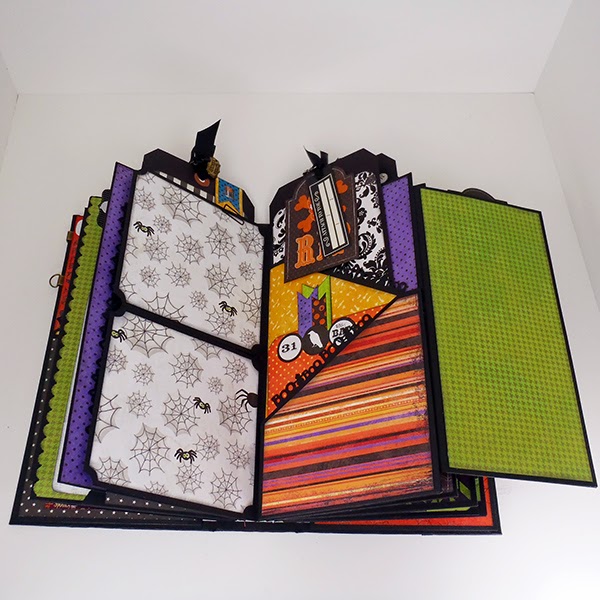
Now here are the pictures of the Album, and all of the pages, that you see inside of the boot above...as you can tell from the photos there are lots of interactive pages to open and tags to pull out.  I am sure I will be able to fit tons of photos into it, but I may have to remove some of the interactive stuff because adding the photos will probably make it to bulky to fit back into the boot... :0(   

I don't know for sure...we'll see...
This is the Album pulled from the Witches Boot and the rest of the photos are of the
different pages inside...


My Project Recipe:

Papers and Embellishments that were part of the paper collections - Black Bazzill Cardstock, Fright Delight by Bo Bunny, Thirth One, by Pebbles, Happy Haunting by Graphic 45, Arsnic & Lace by Bazzill, 2012 K& Company Halloween Paper Pack, Trick or Treat by Bella Blvd and Thrilling by Authentique

Embellishments - Scarecrows on boot by Jolee's Boputique, #31 on boot by Theresa Collins Masquerade Party, Toe Tags by ? and Chalkboard Stickers by Pebbles

Misc Stickers - Fright Delight by BoBunny, Fancy Firlls by BBP and Halloween Parade by Doodlebug Designs

Paper Punches by Martha Stewart - Traditional Scallop, Boo, Cats, Spider Web, Spider and the Spider Web Circle Edge Punch

Paper Punch by EK Success - Scallop

WeR Memory Keepers Corner Punches - 1/4 Round, Photo and Stub

From My Stash - Ribbon, Brads, Charms, and Chain


Thanks so much for stopping by today...


Hugs...