Saturday, November 2, 2013

Halloween Witches Boot

I have the cutest Witches Boot to share today. In August I joined a kit club called "Paper Phenomenon Holiday Kit Club" where I purchased a group of holiday kits.  Along with the Holiday kits, which includes everything you need to complete it including videos and pdf's, there is also a "bonus kit" that you get that is only pdf instructions and videos.  I am having the best fun with these kits!!!

This Halloween Witches Boot is the October Holiday Kit Club item.  I had so much fun making it...this one was not made using the  papers from the kit club because I just couldn't wait after I viewed the videos on the web site...so I used some paper packs from last year, a few newly purchased papers and a bunch of new embellishments from this years selection.

I'm going to put all of the photos from my Children and my Grandchildren's Halloweens into it!  It will really be a beautiful holiday show piece for many years to come...

Here it is, the Witches Boot with the Album nestled inside of it...enjoy!


Side 1 of Boot...can you see the lacing of the ribbon up the front of the boot?


Side 2 of Boot


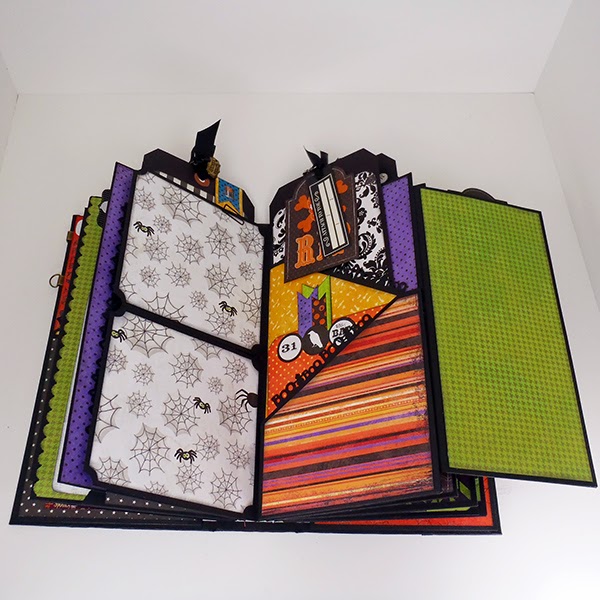
Now here are the pictures of the Album, and all of the pages, that you see inside of the boot above...as you can tell from the photos there are lots of interactive pages to open and tags to pull out.  I am sure I will be able to fit tons of photos into it, but I may have to remove some of the interactive stuff because adding the photos will probably make it to bulky to fit back into the boot... :0(   

I don't know for sure...we'll see...
This is the Album pulled from the Witches Boot and the rest of the photos are of the
different pages inside...


My Project Recipe:

Papers and Embellishments that were part of the paper collections - Black Bazzill Cardstock, Fright Delight by Bo Bunny, Thirth One, by Pebbles, Happy Haunting by Graphic 45, Arsnic & Lace by Bazzill, 2012 K& Company Halloween Paper Pack, Trick or Treat by Bella Blvd and Thrilling by Authentique

Embellishments - Scarecrows on boot by Jolee's Boputique, #31 on boot by Theresa Collins Masquerade Party, Toe Tags by ? and Chalkboard Stickers by Pebbles

Misc Stickers - Fright Delight by BoBunny, Fancy Firlls by BBP and Halloween Parade by Doodlebug Designs

Paper Punches by Martha Stewart - Traditional Scallop, Boo, Cats, Spider Web, Spider and the Spider Web Circle Edge Punch

Paper Punch by EK Success - Scallop

WeR Memory Keepers Corner Punches - 1/4 Round, Photo and Stub

From My Stash - Ribbon, Brads, Charms, and Chain


Thanks so much for stopping by today...


Hugs...


Wednesday, October 23, 2013

Boo! Layout

Good Morning...today I am going to show you the second project my sister and I did...

I had recently watched a YouTube video by Limor Webber on making her Boo! multi-media scrapbook page layout.  You can find it HERE!  It was the perfect way for us to display photos of our grandchildren's Halloween Costumes that they will be wearing this year.  It was very fun to do except for the cheese cloth webs...lol!  They seem so easy to do but wow, we had quite a time getting it to look like a web verses a glob of cheese cloth...but I think we finally got it and here is the result.

Enjoy...


Layout Recipe...
Papers by Prima - Engraver and Sunrise/Sunset Collections
Black Bazzill card stock
12 x 12 piece of Heavy Chipboard for backing the layout as we are putting them inside a display case/frame
Distress Paint - Black Soot (used to color BOO!)
BOO! Letters - Pebbles ABC Stickers
Clocks and Gears - Prima Mechanicals
Flowers - Prima and Recollections
Ruler - Colored wood with Engraver Paper Ruler
Chipboard covered with Engraver Paper flower Paper cut 1 3/4" x 1 3/4"
Metal Die - Tim Holtz Spider Web by Sizzex
Metal Flowers by Prima
White Inkssentials Pen
Black Leaves from the Prima Chalkboard Collection
Cheese Cloth
Black Lace
Prima Chalk Inks - Rusty Keys, Old Road and Black Coal


Thanks for stopping by...

Hugs...


Monday, October 21, 2013

Artist's Palette Altered

I just finished this cute altered artist's palette with my sister.  She is here to craft with me for a few days and this is the first project we completed...  We have lots more project to work on so I'll post more when we have them completed!   Three more fun crafty days ahead until she has to go back home...lol!

The inspiration for this project came from Miranda Edney...she made one for the Shimmerez web site.  You can find her altered palette HERE !  She is quite amazing as you will see...

I have listed below the items I used...Enjoy


Project Recipe:
Wood Artist's Palette from Hobby Lobby
Liquitex Gesso
Liquitex Modeling Paste
Glossy Accents
Stickles Star Dust
Acrylic Paints - Porcelain Doll by Martha Stewart, Ballet Pink by Folkart and China Blue by Apple Barrel
Glimmer Mist - Jingle Bells, Patina
Spritz - Cotton Candy
Heidi Swapp - White
Inks - Prima Chalks Coldsfoot Petals & Old Rose and Ranger Archival Black
Clear Stamps - Prima 960810, 563042 and 960896
Stencils - Prima Lg Butterflies 960452 & Checkers 960179, Heidi Swapp Butterflies, and Crafters Workshop Mini Fleur DeLis
Texturez - Crushed Coral
Prima Embellishments - Flowers, Bird, Topiary Tree, Corners, Wood Leaves and Flowers, Love Blub
Petaloo Flowers
Chipboard Bird Cage - Blue Fern Studios
From my stash - Cheese Cloth, Pearls, Pink Pearls, Pearl Strand


Thanks for stopping by...

See you again soon...

Hugs...

Saturday, October 5, 2013

File Folder Holder

You know how you make something for someone else and then you get done and you think "WOW I really love this...maybe I can keep it myself"?  Well that's how I fell about this file folder holder.  LOL  I actually made this for my daughter and yes, I gave it to her today but I really wanted to keep it for myself since it turned out so cute...hahaha

This file folder is made from a cardboard box that I purchased from Staples, which is an office products store.  I'll post pictures of it below, you will see how very unappealing it is to start with.  Brown and black is not the greatest look.  So I took this and folded it and glued everything closed to be sure it stayed real sturdy.  Once it is completed the Heidi Swapp Scrapbook Files fit perfectly inside of it.

These are the steps I took to complete the look:  I painted the whole box with white Gesso the covered everything except the inside with Multi-Medium  Matte (as the glue) and Tim Holtz tissue paper.  Next another light cover of Gesso mixed with water and when that was dry I used some different colored acrylic paints brushing here and there.  Next I used some colored sprays to add some sparkle and drips.  The next layer is three different Prima clear stamps using three different colored chalk/inks.  On top of that I added a layer of Molding Paste and Texturez using a couple different stencils.  Once everything was dry I used the sprays and added a few light sprays here and there.  Once that was done the decorating began...

I started by adding the ribbon, a couple of doilies and cheese cloth, then everything else is just layered on top of these. Some of the elements have been altered using Gesso and the words "A Moment In Time" has been embossed using Shabby Pink Embossing Enamel...so pretty when embossed!  The ribbon was white and I sprayed it using Glimmer Mist Silk which turned it a very pretty color which matched my box perfectly.  Below is a complete listing of all the products I used...

See how pretty it turned out?  Now you know why I wanted to keep it...lol!  Well I guess I'm going to be making myself one too!

Finished File Box

File box as it comes from Staples
Back of File Box
Left Side/Front View
Right Front/Side View

Inside View
Another shot of the Inside

Project Recipe:
Studio Gesso White
Studio Multi-Medium Matte
Liquitex Flexable Molding Paste
Sprays: Spritz-Truffle, Vibes-Jeni B Blue, Glimmer Mist-Silk and Heidi Swapp-White
Acrylics - Lime Green, Porcelain Doll, Robins Egg
Texturez - Patina
Ingred Bolme Chalk Inks - Teal Damask and Old Rose
Ranger - Archival Ink Black
Distress Ink - Frayed Burlap and Forest Moss
Stencils - Crafters Workshop-Mini Tiny Circles and Prima-564278
Prima Clear Stamps - 960896, 960810 & 563042
Prima - Delight Paper Collection
Tim Holtz - Tissue Paper and Metal #25 Tag
Flowers - Prima & Petaloo
Finnabair - Metal Clock Circle
Prima - White Metal Clock, Zipper Pull, Wood Flowers & Leaves, White Frame 570019, and
     Topiary Tree 569983
Leaky Shed - Chipboard Ring
Gina's Designs - Chipboard Words (embossed using Shabby Pink Embossing Enamel) and Steampunk
     White Doily (sprayed with Heidi Swapp White)
From my stash - Brads, Doilies, Cheese Cloth, Beads, Light Bulb, and Clear Acrylic Bubbles


Thanks for stopping by...

See you next time...

Hugs...


Wednesday, October 2, 2013

Bonus Project for September's Paper Phenomenon Kit Club

I recently joined an online kit club over at Paper Phenomenon which is owned and operated by Kathy Orta Files, you can find it HERE.  She has really amazing projects that she designs herself.  Each of her kit clubs consist of three months of projects along with a bonus project for each of those months.  I am currently in the September, October and November kit club and this is the bonus project for September.  It's an 8x8 inch box that opens up in the front and holds three albums inside when it's closed.  One is a larger album 7 1/2" x 7 1/2" and two smaller albums that are 3 3/4" x 7 1/2".  The smaller albums are perfect for using #6 tags and they can hold 8 tags each.  I made most of the tags myself using 8x8 inch papers from the paper collection I used and also bazzill cardstock in colors that coordinate with the collection.

The paper collection I used is the Graphic 45 Typography papers and chipboard embellishments.  I also added two wood pieces, from Kaisercraft, on the front which I painted with black gesso.  The closing clasp was something I found a year or so ago at my local scrapbooking store and it works great for keeping my box closed.

Here it is...enjoy...

Box Open and Albums Displayed

Box Closed
Side View of Box...The Albums are visible through the opening.
Largest Album
1 of 2 Smaller Albums
2 of 2 Smaller Albums


The other items used for this project are;
     Bazzill Cardstock - Black, Red, Blue, Green and Gold
     Clock Face and Brads by Prima
     Metal pieces by Finnabair (Prima)
     Metal Die - Decorative Duo by Die Namics
     One Inch Hole Punch by EkSuccess
     Film Strip Punch by EkSuccess
     Metal Key Hole by Graphic 45
     All edges are inked using Ranger Distress Ink, Black Soot
     From my stash - Metal Crown, Lace, Doilies, Paper Clips, and Tags (some I purchased and some I
          made myself)


Thanks for stopping by...

Hugs...

Saturday, September 21, 2013

Vintage 8x8 Box

Today I am going to share my "finally" finished class project from a class I took last evening at my favorite scrapbooking store "Scrapbook Island".  It was taught by Karen France, an amazing teacher who is so talented.  My youngest daughter and I love to attend her classes together.  She just started a web site, with a good friend of hers, called "The Mixie Chicks" which you can find HERE.  Check it out and you will see she is amazing!!!

I didn't actually finish last night but I worked on it today and finally got it completed!  I LOVE IT!!!  It was made using a Graphic 45 8x8 box and lots of Bronze Ver-day by Ten Seconds Studio.  The papers were from Prima called Delightful, which is a very vintage line they just came out with.  Karen also provided us with vintage string, lace and buttons.  The sewing machine, bird cage and dress form are metal dies by Tim Holtz.  This project was so much fun to do... the class was four hours and jam packed with things for us to do, so much so that I could't keep up and had to leave with my project 80% completed...haha.  I rarely complete my projects in the classes I take but the truth is that I would rather finish them at home anyway, that way I'm not rushed and all stressed out!

We put the Ver-day on most of our embellishments.  It's very time consuming because of the drying time but It looks great!  Look closely and you can see which items we did this on...Top Knob, Buttons, Photo Corners, Straight Pins, Hat Pin, Flowers, Scissors, Bird Cage, Dress Form, Clothespin and the Initial on the top tag.  We also did parts of the box which makes the box look like it is made of metal.  So beautiful!  You can tell by the green patina look...that's what Ver-day does.  It turns wet bronze areas green...

Here it is...

Finished Box

This is the back of the box

Top Corner Cluster

Top and Looking down into the box

This is the inside of the box before the cover is slipped on


Thanks so much for stopping by...

Hugs...


Tuesday, September 10, 2013

Fancy Cupcake

I made a Fancy Cupcake today! Sounds yummy huh?  It has a pretty blue cupcake wrapper and it's loaded with flowers on the top of it!  Am I making you hungry for a sweet cupcake?  It really is cute but... unfortunately it can't be eaten because it's made out of paper!  Haha!

Awhile back I watched a video made by Miranda Edney, which you can find HERE, on making these cute cupcakes using Graphic45 papers.  The tutorial is actually at the end of the video because the beginning is her showing the projects she submitted to become a Graphic45 designer.  She did actually get picked to be a designer for Graphic45 and she well deserves it...her projects are amazing!  Check out her blog, she calls herself MsLiberty25, it really is amazing the projects she creates!  When Miranda made her cupcakes she made lots of them and created a really pretty display using a three teared cupcake holder that she also made herself.  This is a direct link to her blog posting...CLICK HERE it really is worth seeing it's so beautiful!

Anyway...I've been wanting to make one of these cupcakes but couldn't seem to find the time, so yesterday I decided to make time and here is my paper cupcake.  I did not use Graphic45 product opting instead to use some left over papers from the Sweet Nothings Collection by Kaisercraft.  It only takes one full 12 x 12 inch sheet of paper for all of the flowers and a 4 x 12 inch piece of contrasting paper for the wrapper.   It turned out so adorable!  The top of the cupcake is removable so I made a set of circle tags to sit inside.  I wanted the tags to kind of stand up instead of lying flat inside of the cupcake wrapper, so I added a cluster of items to one side to the bottom of the wrapper which causes the tags to sit inside at a slant.  When you take off the top you see the tags, then when you remove the tags you can see the cluster at the bottom.  It's very cute...


Fancy Cupcake

Top is removable - Can you see the tags inside?

Inside Cluster

Tags which sit inside of the Cupcake

I used the following for this project:
     Sweet Nothings Papers by Kaisercraft
     9 oz white paper cup
     3" Styrofoam ball cut in half
     Chipboard Butterfly from Blue Fern Studios - colored using Gesso, Shimmerz in Teal, Viva Inka Gold in
          Platinum, Perfect Pearls in Blue Smoke and the edges are inked with Distress Ink Vintage Photo
     Paper Punch - 1" and 1/2" Flower both by EK Success, Butterflies by Martha Stewart and a mini tag by
          Taylored Expressions
     From my stash - Pearls, wood spool, embroidery thread, mini wooden clothespin, ribbon, string and
          buttons
     For sparkle I used Stickles Star Dust


Thanks for stopping by...

Hugs...


Monday, September 9, 2013

Everyday Vintage Paintables - 5x7 Canvas


Good Morning and Happy Monday!

Over the weekend, after watching a Prima YouTube video made by Limor Webber, I played with my new Everyday Vintage Paintables.  I used the Chalk Inkers by Prima/Ingvild Bolme stamping each color on my craft mat then added water to the ink which makes water color paints.  I watercolored the 4 x 6 Paintable card.

For the canvas I layered ripped pieces of the Everyday Vintage "Love" paper line, lace and stenciled a design using molding paste. Then I used the same water colors as I used for the card and colored up the layered canvas...lots of color dots, sprays and drips.  I also added a bit of gesso and stamped in black archival ink in a few places.

When both were dry I attached the 3 x 5 card onto the top of a 5 x 7 canvas using pop dots.  To finish I added a wood title "Smile", which was painted and stamped also, lots of prima flowers and a cute die cut swirl.  I also had this cute little clip hanger which I am using to display the finished project on my studio wall.  It's too cute!

Enjoy...


I used the following things on my project:
     Prima Everyday Vintage Paintables 655350
     Prima Everyday Vintage Paper Pack & Button...Love Letters
     Chalk Inkers by Prima/Ingvild Bolme...Teal Damask, Coltsfoot Stemens & Rock Moss
     Prima Flowers and Leaves
     Prima Wood Embellishment "Smile" (painted, stamped & gesso)
     Prima Clear Stamps...960810 & 655350 and Black Ranger Archival Ink
     Prima Stencil 561048
     Gesso
     Molding Paste
     Masking Tape stamped with the numbers from a Prima Engraver Cling Stamp Set & black Archival Ink
     Lace Pieces from my stash
     Stickles Star Dust for some sparkle
     Pop Dots


Thanks for stopping by...

See you again soon...

Hugs...


Friday, September 6, 2013

Sweet Layout


Good Morning and Happy Friday!

I'm going to share a scrapbook layout I made using a kit that I purchased from The Scrapbook Diaries.  It's called "Sweet" by Lene Bjornerud.  The kit comes with detailed instructions, access to a how to video and everything you need to complete the page including sprays, paint and gesso.  I added a photo of myself and my eldest daughter from when we were on vacation in Turks and Caicos this summer.  It really is so pretty with all of the different pinks included in the kit.  It was so cute that I mounted it inside of a black frame and placed it onto my studio wall...Love It!

Here is a photo of the layout...enjoy!


Thanks for stopping by...

Hugs...


Monday, September 2, 2013

Birthday Cupboard

Today I have a very special post to share with all of you...

My youngest daughter is a very talented artist, kind of like her mom but better...lol!   For my birthday yesterday she gave me a wooden cupboard that she built and decorated.  It's to hold all of my cute little antique bottles.

I REALLY LOVE IT!!!  It's so me...

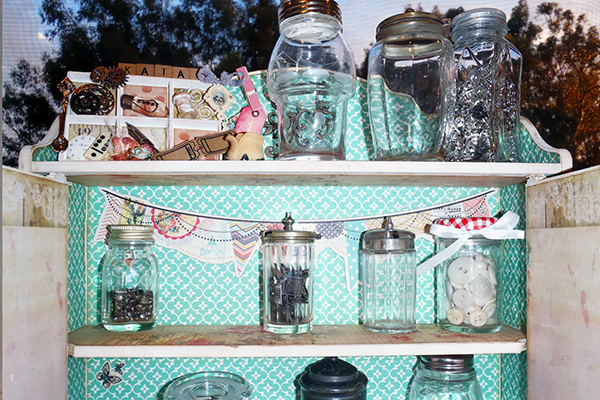
She knows me so well!  I have little antique bottles sitting around my studio/craft room that are filled with the tiny things that I use on a daily basis for my crafting projects...brads, buttons, screws, snaps, charms, beads, that kind of stuff. She decided that I needed something to hold them in so that they were all in one place and easy for me to access.  One of my other daughters gave me six more little antique bottles, three of which I have already filled and placed into the cabinet.  The cabinet also has two little drawers at the bottom, under the doors, which are perfect for storing some of my special paper clips and larger charms.

This is what she made...Isn't it great!!!  If you look closely you can see the tiny items inside some of the bottles...  Sooooo Cute and there's still room for more!

Enjoy...

Front View
With the doors open...see the drawers too!
Close-up of top shelf
Close-up of bottom two shelves and the open drawers


Thanks so much for stopping by...

See you next time...

Hugs...