Saturday, September 21, 2013

Vintage 8x8 Box

Today I am going to share my "finally" finished class project from a class I took last evening at my favorite scrapbooking store "Scrapbook Island".  It was taught by Karen France, an amazing teacher who is so talented.  My youngest daughter and I love to attend her classes together.  She just started a web site, with a good friend of hers, called "The Mixie Chicks" which you can find HERE.  Check it out and you will see she is amazing!!!

I didn't actually finish last night but I worked on it today and finally got it completed!  I LOVE IT!!!  It was made using a Graphic 45 8x8 box and lots of Bronze Ver-day by Ten Seconds Studio.  The papers were from Prima called Delightful, which is a very vintage line they just came out with.  Karen also provided us with vintage string, lace and buttons.  The sewing machine, bird cage and dress form are metal dies by Tim Holtz.  This project was so much fun to do... the class was four hours and jam packed with things for us to do, so much so that I could't keep up and had to leave with my project 80% completed...haha.  I rarely complete my projects in the classes I take but the truth is that I would rather finish them at home anyway, that way I'm not rushed and all stressed out!

We put the Ver-day on most of our embellishments.  It's very time consuming because of the drying time but It looks great!  Look closely and you can see which items we did this on...Top Knob, Buttons, Photo Corners, Straight Pins, Hat Pin, Flowers, Scissors, Bird Cage, Dress Form, Clothespin and the Initial on the top tag.  We also did parts of the box which makes the box look like it is made of metal.  So beautiful!  You can tell by the green patina look...that's what Ver-day does.  It turns wet bronze areas green...

Here it is...

Finished Box

This is the back of the box

Top Corner Cluster

Top and Looking down into the box

This is the inside of the box before the cover is slipped on


Thanks so much for stopping by...

Hugs...


Tuesday, September 10, 2013

Fancy Cupcake

I made a Fancy Cupcake today! Sounds yummy huh?  It has a pretty blue cupcake wrapper and it's loaded with flowers on the top of it!  Am I making you hungry for a sweet cupcake?  It really is cute but... unfortunately it can't be eaten because it's made out of paper!  Haha!

Awhile back I watched a video made by Miranda Edney, which you can find HERE, on making these cute cupcakes using Graphic45 papers.  The tutorial is actually at the end of the video because the beginning is her showing the projects she submitted to become a Graphic45 designer.  She did actually get picked to be a designer for Graphic45 and she well deserves it...her projects are amazing!  Check out her blog, she calls herself MsLiberty25, it really is amazing the projects she creates!  When Miranda made her cupcakes she made lots of them and created a really pretty display using a three teared cupcake holder that she also made herself.  This is a direct link to her blog posting...CLICK HERE it really is worth seeing it's so beautiful!

Anyway...I've been wanting to make one of these cupcakes but couldn't seem to find the time, so yesterday I decided to make time and here is my paper cupcake.  I did not use Graphic45 product opting instead to use some left over papers from the Sweet Nothings Collection by Kaisercraft.  It only takes one full 12 x 12 inch sheet of paper for all of the flowers and a 4 x 12 inch piece of contrasting paper for the wrapper.   It turned out so adorable!  The top of the cupcake is removable so I made a set of circle tags to sit inside.  I wanted the tags to kind of stand up instead of lying flat inside of the cupcake wrapper, so I added a cluster of items to one side to the bottom of the wrapper which causes the tags to sit inside at a slant.  When you take off the top you see the tags, then when you remove the tags you can see the cluster at the bottom.  It's very cute...


Fancy Cupcake

Top is removable - Can you see the tags inside?

Inside Cluster

Tags which sit inside of the Cupcake

I used the following for this project:
     Sweet Nothings Papers by Kaisercraft
     9 oz white paper cup
     3" Styrofoam ball cut in half
     Chipboard Butterfly from Blue Fern Studios - colored using Gesso, Shimmerz in Teal, Viva Inka Gold in
          Platinum, Perfect Pearls in Blue Smoke and the edges are inked with Distress Ink Vintage Photo
     Paper Punch - 1" and 1/2" Flower both by EK Success, Butterflies by Martha Stewart and a mini tag by
          Taylored Expressions
     From my stash - Pearls, wood spool, embroidery thread, mini wooden clothespin, ribbon, string and
          buttons
     For sparkle I used Stickles Star Dust


Thanks for stopping by...

Hugs...


Monday, September 9, 2013

Everyday Vintage Paintables - 5x7 Canvas


Good Morning and Happy Monday!

Over the weekend, after watching a Prima YouTube video made by Limor Webber, I played with my new Everyday Vintage Paintables.  I used the Chalk Inkers by Prima/Ingvild Bolme stamping each color on my craft mat then added water to the ink which makes water color paints.  I watercolored the 4 x 6 Paintable card.

For the canvas I layered ripped pieces of the Everyday Vintage "Love" paper line, lace and stenciled a design using molding paste. Then I used the same water colors as I used for the card and colored up the layered canvas...lots of color dots, sprays and drips.  I also added a bit of gesso and stamped in black archival ink in a few places.

When both were dry I attached the 3 x 5 card onto the top of a 5 x 7 canvas using pop dots.  To finish I added a wood title "Smile", which was painted and stamped also, lots of prima flowers and a cute die cut swirl.  I also had this cute little clip hanger which I am using to display the finished project on my studio wall.  It's too cute!

Enjoy...


I used the following things on my project:
     Prima Everyday Vintage Paintables 655350
     Prima Everyday Vintage Paper Pack & Button...Love Letters
     Chalk Inkers by Prima/Ingvild Bolme...Teal Damask, Coltsfoot Stemens & Rock Moss
     Prima Flowers and Leaves
     Prima Wood Embellishment "Smile" (painted, stamped & gesso)
     Prima Clear Stamps...960810 & 655350 and Black Ranger Archival Ink
     Prima Stencil 561048
     Gesso
     Molding Paste
     Masking Tape stamped with the numbers from a Prima Engraver Cling Stamp Set & black Archival Ink
     Lace Pieces from my stash
     Stickles Star Dust for some sparkle
     Pop Dots


Thanks for stopping by...

See you again soon...

Hugs...


Friday, September 6, 2013

Sweet Layout


Good Morning and Happy Friday!

I'm going to share a scrapbook layout I made using a kit that I purchased from The Scrapbook Diaries.  It's called "Sweet" by Lene Bjornerud.  The kit comes with detailed instructions, access to a how to video and everything you need to complete the page including sprays, paint and gesso.  I added a photo of myself and my eldest daughter from when we were on vacation in Turks and Caicos this summer.  It really is so pretty with all of the different pinks included in the kit.  It was so cute that I mounted it inside of a black frame and placed it onto my studio wall...Love It!

Here is a photo of the layout...enjoy!


Thanks for stopping by...

Hugs...


Monday, September 2, 2013

Birthday Cupboard

Today I have a very special post to share with all of you...

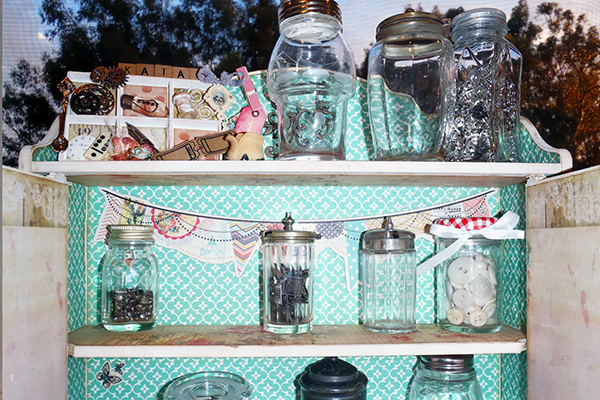
My youngest daughter is a very talented artist, kind of like her mom but better...lol!   For my birthday yesterday she gave me a wooden cupboard that she built and decorated.  It's to hold all of my cute little antique bottles.

I REALLY LOVE IT!!!  It's so me...

She knows me so well!  I have little antique bottles sitting around my studio/craft room that are filled with the tiny things that I use on a daily basis for my crafting projects...brads, buttons, screws, snaps, charms, beads, that kind of stuff. She decided that I needed something to hold them in so that they were all in one place and easy for me to access.  One of my other daughters gave me six more little antique bottles, three of which I have already filled and placed into the cabinet.  The cabinet also has two little drawers at the bottom, under the doors, which are perfect for storing some of my special paper clips and larger charms.

This is what she made...Isn't it great!!!  If you look closely you can see the tiny items inside some of the bottles...  Sooooo Cute and there's still room for more!

Enjoy...

Front View
With the doors open...see the drawers too!
Close-up of top shelf
Close-up of bottom two shelves and the open drawers


Thanks so much for stopping by...

See you next time...

Hugs...


Tuesday, August 20, 2013

Birthday Box and Card for Mom

Good Morning!

Today I am sharing a decorated wood box and a birthday card, which fits inside the box, that I have made for my Mother's Birthday.  I think she's going to really LOVE this!  My mom loves antiques so I tried to make this box and card look really vintage.  I used one of my favorite paper collections "Fairy Rhyme by Prima".  This collection has all kinds of cute chipboard embellishments, flowers and pearl swirls, which I included in my project too!

The box is a wood box which I painted a Warm White.  Then I added the papers on the top of the box and on the inside top and bottom...see the pictures below!  To give the projects some texture, after adding the papers, I stenciled using Heavy Gesso the butterflies onto the top of the box and butterflies and dot lines on the card before spraying them each using some of the wonderful colored sprays from Shimmerz!  I have fallen in love with these sprays...they are so pretty with that shimmering effect they have when dry...check out the Shimmerz web site at www.shimmerzpaints.com . They have a great selection of colors to choose from!

To complete the project I decorated everything with lots and lots of embellishments...

Here is my finished box and card...enjoy!


Top of Box
Box opened and the card fits perfectly inside
Inside top of box
Inside bottom of box
Card Front
Card Inside

My Project Recipe for both the box and the card:

Wood Box from Michaels - Painted using Americana Warm White
Flowers - Botanicals by Farm House, Wild Orchid Crafts, Recollections and Prima

Paper Collection - Fairy Rhyme by Prima of which I used Papers, Flowers, Chipboard pieces, Letters, 
Buttons and Say it in Crystals

White Bazzill Cardstock
Frilly Square Die by GoKreate - to make the shape of the card
Martha Stewart Butterflies Punch
Butterfly by Petaloo
Junkyard Findings/Vintage Trinkets by Prima - Word Bulb & Clocks
Metal Flower by Prima
Stencil  Butterflies by Prima, Mariposas by TCW and Circle Lines by Prima
White Trim Ribbon by Prima
Dress Form Paper Clip by Prima
From My Stash - Snaps, Doily, Metal Key, Hat Pin & Ceramic Flower
Heavy Gesso mixed with regular Gesso
Glossy Accents
Glimmer Mist - Dazzling Diamonds
Star Dust Stickles
Shimmerz Spritz - Sea Foam, Cotton Candy & Mud Pie
Shimmerz Vibes, Pop Art Pink & Rolling in the Hay


Thanks for stopping by...

See you again soon...

Hugs...


Sunday, August 18, 2013

Voyager Box

I came across a new web site the other day that really excited me...it's called Paper Phenomenon found at http://paperphenomenon.blogspot.com .  This web site is owned by a lady named Kathy Files who creates and sells monthly project kits.  You subscribe to these project kits for three months at a time, so after those three months you can either discontinue the club or purchase another three months.  I have just subscribed to the "September, October & November" kits, but there are lots of older project kits that I would love to make.  She does sell these past projects, but you can't buy the complete project as sold in the original club kit.  When you buy these older projects you are given all of the instructions and measurements to make it, but nothing else...no papers or hardware.

I recently purchased the Voyager Box (May 2013 Project Kit) and just finished making it today.  I think it turned out perfect!  I decided to make a modification to her original instructions.  The original calls for two doors that cover the front area (on hinges so they open and close) but I didn't want those because I'm going to use my box on my desk, as storage, to hold those items that I use quite often.  I used the newly released Teresa Collins "Memorabilia" collection which look great on the Box.

Next up I'm going to make a book called "The Ultimate Organizer".  It was also part of this May 2013 monthly project kit and was meant to reside inside the drawer of the Voyager Box.  I have already filled the drawer up with STUFF...lol!  My Organizer will not be for the box drawer but will just be set out on my book shelf.

Here is my Voyager Box...hope you like it!


The drawer opens up...

A side view...

Filled with STUFF!


My Project Recipe:
Voyager Box Instructions by Kathy Files of the Paper Phenomenon
Paper - Memorabilia Collection by Teresa Collins and Black Bazzill cardstock
Chip Board - Extra Heavy by Paper Accents
Corner Die - Photo Corner by Quickutz
Distress Ink - Frayed Burlap
Glue
Score Tape
Matte Multi-Medium by Studio (Instructions called for a coat of glue on the whole box but I used this instead of glue)


Thanks for stopping by...

Hugs...


Thursday, August 15, 2013

Tagged "Life"

One of the blogs I love to follow is by Frank Garcia.  He works for Prima and is the editor of an online magazine called "Paper Haus".  I subscribe to the magazine and also to Franks Blog, www.hausofw.com, so I receive emails with lots of different project ideas.  This tag I am going to share today was one of those projects... "Paper Tag by Erin" dated August 11, 2013.

I used a few of the pieces from the Prima Lady Bird Collection, paper, cutouts and a flower.  It is made with lots of layers consisting of papers, tags, molding paste, masking tape, flowers, lace, ribbons, button and a clear "life" word bubble.  I really enjoyed making it and am planning on using this technique to make a few more.  I think they would be great in Christmas colors and used as the tag on gifts for Christmas.

Here it is...

I had to photograph it on top of black card-stock so that you could see the white netting bow!


My Project Recipe:
Paper - Prima Lady Bird Collection
Stencil - Prima Circles #922140
Metal Die - Quick Kutz Nesting Doily Rectangle
Word Bubble - Heidi Grace Sticker "life"
Flowers - Prima
Punches - Ek Success and Martha Stewart - Botanical Scallop, Double Scallop & Doily Lace
Clear Stamps - Prima #960803, 563202 & 563042, Kaiser Craft "Windsor" and MME "Find Your Wings
     & Fly"
Distress Ink by Ranger - Frayed Burlap
Miscellaneous Stash - Lace, Masking Tape, Pearls & Wire, Pop Dots, Seam Binding Tape & Netting to make a bow.


Thanks again for stopping by...

Hugs...


Sunday, August 11, 2013

Doll Canvas 8x8

Hi again...here the second class taught by Julie Nutting that I took on Saturday at the Scrapbook Island store.

This project uses mixed media techniques, another Julie Nutting Doll Stamp and the Prima Divine Paper Collection.  The canvas is painted using the Studio paint Classic Teal mixed with an off white acrylic paint from Michaels (don't know what brand it was).  We glued wings and some words of wisdom on the right side of the canvas and a piece of ruler paper on the left.  When that was dry we used a Crafters Workshop Stencil  "Reversed Chicken Wire" and sprayed in a few places using a pink colored Tattered Angels spray (didn't get the name of this either).  Then on top of the spray we used Heavy Gel Paste mixed with the same off white acrylic paint as above and, using the Crafters Workshop Stencil "Flower Frenzy", spread it over the stencil to create a really great textured effect.  It took quite awhile to dry but while that was drying we stamped and clothed our Doll...so pretty!  She was added to the canvas along with some ribbon and flowers for our finished project...and I even had thirty minutes of class time to spare!  WOW!!!  It was really a fun day and so wonderful to meet and learn from Julie.  She really is amazing!

Here's my finished canvas...Enjoy!

Prima Doll #910280


Again thanks for stopping by!

Hugs...


Doll Tag Class with Julie Nutting

Yesterday I participated in a class taught by Julie Nutting at my favorite scrap booking store "Scrapbook Island".  Julie is the creator of the wonderful doll stamps produced by Prima.  She grew up in Cupertino but now lives in the LA area not far from Prima headquarters.  It was so great to have her here teaching for all of us.  In the first class of the day (she taught two separate classes Saturday) we made two very cute tags using her Doll Stamps, her Tags and Prima papers from the Divine Collection.  It was a really fun project and we finished most everything in the two hours of the class.

However...when I got home I wanted to add some things that we did not do in the class and I really LOVE how they turned out.  I added lots of Stickles Star Dust for that glittery look around the wings, shirt ruffles, flower petals, swirl dots in the background and small dots on the doily.   I also used some Glossy Accents so that the shoes and headbands shined.  I can't wait to make more they are so fun to do, it's like paper dolls when I was younger...lol.

Here they are my Beautiful Tags!!!


Doll Stamp is Prima #910242


Doll Stamp is Prima #910259


Thanks for stopping by!

Hugs...