Showing posts with label Whimsy Stamps. Show all posts

Monday, April 29, 2013

True Friend with Violet Vintage


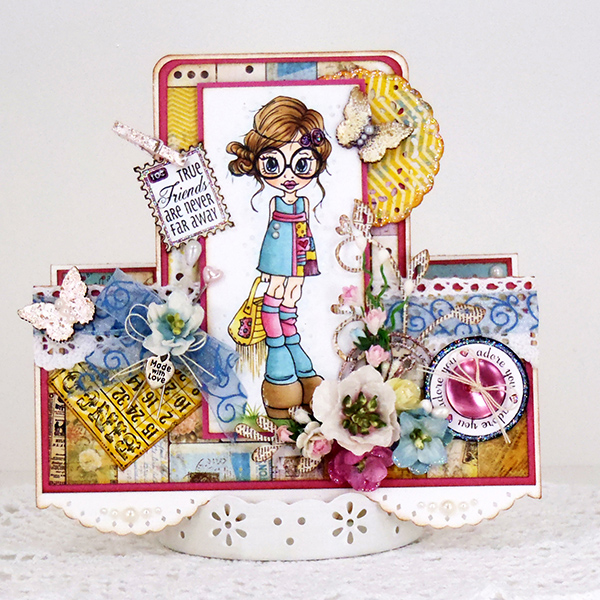
Happy Monday Friends...today I'm going to share a card that I made using one of my new Saturated Canary Digitals "Violet Vintage".  I just Love her glasses and that cute fringed purse she is carrying.

It's the first time I made a step card and it was quite challenging because I didn't have a pattern to follow.  I saw a picture of one on a blog but couldn't find a pattern so I had to make my own.  After two failed attempts, those fold measurements were very tricky, I came up with this final version.

I also had lots of fun playing with a new embossing powder by Stampendous called Fran-tage Shabby Pink and Aged Ivory.  I was Fran-tageing everything I could find...haha!   I really love how my circle paper clip, mini clothespin and wooden mini butterflies, turned out...sooooo cute!!!  A couple of days ago I received a bunch of new rubber stamps from Whimsy Stamps so I included three of them in my card layout too...

So here it is...hope you like it!

There are actually three scallops along the bottom!

Side View where you can see the step in the card!

My Project Recipe:
     Digital - Violet Vintage by Saturated Canary
     Stamps - Friends & Family Mini Postage, Everyday Button Sentiments and Mini Backgrounds all by
          Whimsy Stamps
     Paper - Bazzill White and Cest La Vie Collection by BoBunny
     Flowers - Petaloo
     Paper Punches - Diamond Lace
     Metal Die - French Pastry Tiny Doily by Cheery Lane, Vintage Leaf & Heart Swirl by DooHickey
     Inked Edges - Distress Ink vintage Photo
     Sparkle & Shine - Stickles Star Dust and Glossy Accents by Inkssentials
     My Stash - Ribbon, Pearls, Charm, String, Button & Lace

     Miscellaneous items - Mini Clothespin, Life Time Paper Clip & Wooden Butterflies are embossed
          using VersaMark Ink Pad and Stampendous Fran-tage Shabby Pink & Aged Ivory.

Colored in Copics - Face E0000, E00, R01          Eyes B41, B12          Hair E31, E55, E57
Pink R81, R83, R85          Yellow Y11, Y21, Y32          Green Grass G20, G21, G82, YG61
Blue G52, BG70, BG72          Shoes E42, E43, E55          Dotted Outline B0000, C00, 0 Blender


Thanks for stopping by...

Hugs...


Friday, December 21, 2012

Christmas Stocking Card

Good Evening to you all!

I've been so busy decorating, shopping, wrapping gifts, planning Christmas meals, playing Dragon Vale (oh I know that doesn't have anything to do with Christmas but it is so much fun to play) and browsing through Pinterest for Christmas ideas, that I haven't had much time for crafting...

I had originally planned on making Christmas Cards for family and friends this year too, but well... I've run out of time so maybe next year hahaha.  I did however find some time today to finish a little Christmas Stocking Card that I will save for next year.  I was inspired by a card my mother sent us.  It had the cutest Christmas stocking on the front of it.  I had bought some cut out stockings, which were just the right size; at our local Michael's Craft Store awhile back so I used one as a stencil for cutting out my card.  I cut a heal and toe piece and a cuff for the top of the stocking.  I also cut out a bunch of snowflakes and covered them with Star Dust Stickles to make them shine.  I layered large and small snowflakes together, added a pearl to the middle and attached them to the stocking cuff.  The cuff paper already had snowflakes on it so I just added the ones I made onto those.  The Joy tag is a pre-printed tag from the 6x6 paper pack I used.  I don't know if you can tell or not, but I added Glossy Accents to the letters to make them stand out.  I haven't put anything on the inside of my card yet, I'll probably wait to do that until I know who I will be giving it to.

Soooooo here it is...enjoy!

Front

Peek of Inside

My Card Recipe:
     Digital - Snowman Top O'The Mornin by Whimsy Stamps
     Stamps - Christmas Mini Icon Tags & Christmas Sentiment Tags by Lily of the Valley
     Paper - Bazzill White & Handmade Holiday 6x6 paper pad by simple Stories
     Flowers - Wild Orchid Crafts
     Paper Punches - Alpine & Aspen Snowflakes by Martha Stewart
     Metal Die - Snowflake by DooHickey
     Inked Edges - Distress Ink Vintage Photo
     Sparkle & Shine - Stickles Star Dust and Glossy Accents by Inkssentials
     My Stash - Ribbon & Pearls

Colored in Copics:  Snowman BG0000, C00     Cheeks RV0000, RV00     Top Hat C5, C7, C9
Blue BG18 + 0 Blender     Red R24, R27, R39     Brown Bird E30, E31, E33    
Yellow Beak Y21, YR24     Green YG93, YG95, YG97     Grey Shading C00


Thanks for stopping by...
 
Hugs...


Tuesday, December 4, 2012

3D Snowman Card - Teddy with Penguin


Hi and Good Afternoon,

Today, as promised yesterday, I am posting my second 3D Card.  This one was a bit harder than the first because it required so many more 3D layers but I really like how it turned out.  I again used the Shape EZ Snowy Ball Card from Whimsy Stamps.  I love these Shape EZ Cards...I'm going to pop on over to there web site and buy some more!!! 

Here is my card for today...Enjoy,


Front
Side so you can see the 3D effect
Inside

My Card Recipe:

Card Template - Shape EZ Snowy Ball Card by TLC with Whimsy
Stamps - Teddy with Penguin & Christmas Sentiment Tags by Lily of the Valley and Very Merry
     Christmas by Hero Arts
Ink - Black Momento
Paper - Bazzill White and Handmade Holiday 6x6 Paper Pad by Simple Stories
Flowers - Wild Orchid Crafts and Petaloo
Paper Punches - Snowflakes are Martha Stewart Aspen, Artic and Glacial
Metal Die - Christmas Stacker Tree by Dees Distinctively A Cut Above, Spruce Sprig & Bon
Voyage Foliage & Vintage Leaf from DooHickey
Inked Edges - Distress Ink Vintage Photo & Stormy Sky
Sparkle & Shine - Stickles Star Dust and Glossy Accents by Inkssentials
My Stash - Ribbon, Doily and Pearls

Colored in Copics:     Bear - E30, E33, E35     Red - R24, R27, R37, R39
Grey - C4, C6, C8    Orange - Y17, Y39     Snow - B0000     White Shadow - C00, C2, 0 Blender

3D Instructions - By Mariska Van Der Veer found in the Whimsy Stamps Inspirations Magazine dated December 2011 - Issue 5.

3D Background Under Pieces is Copic W5
3D Pieces were outlined using Copic W10
3D Glue is made by OLBA and called Lijm Kit...I bought this from Whimsy Stamps


Thanks for stopping by...
Hugs...


Monday, December 3, 2012

3D Snowman Card - Bundled Little Snowboy

Good Morning to all!

I have been very busy putting up all of my Christmas decorations this past week!  The house looks great, presents are wrapped and only a couple more gifts to buy...yeah!!!  Now that that's done I can continue on with my Christmas Projects.

I have a Christmas Card to show you today that I did a couple weeks ago.  It is my first try at 3D card making.  I saw some samples in the Whimsy Stamps Inspirations Magazine dated December 2011 by Mariska Van Der Veer.  She has some amazing stuff on her web site, sendingyoualittlesmile.blogspot.com/.  Check it out...such beautiful work! 

Anyway I made my card using the Shape EZ Snowy Ball Card by TLC at Whimsy stamps.  It turned out so cute that I made a second which I will post tomorrow!

Here's my first 3D Card...I really love it...hope you do too!


Front of Card
See the 3D Effect
Inside of Card


My Card Recipe:

     Card Template - Shape EZ Snowy Ball Card by TLC with Whimsy
     Stamps - Bundled Little Snowboy by Whimsy Stamps, Christmas Grungy Messages by LOTV
          and Giving & Receiving by Penny Black
     Ink - Black Momento
     Paper - Bazzill White and Handmade Holiday 6x6 Paper Pad by Simple Stories
     Flowers - Wild Orchid Crafts and Petaloo
     Paper Punches - Snowflakes are Martha Stewart Aspen, Artic and Glacial
     Metal Die - Christmas Stacker Tree by Dees Distinctively A Cut Above, Spruce Sprig & Bon
          Voyage Foliage from DooHickey
     Inked Edges - Distress Ink Vintage Photo & Stormy Sky
     Sparkle & Shine - Stickles Star Dust and Glossy Accents by Inkssentials
     My Stash - Ribbon, Doily and Pearls

Colored in Copics:     Snowman - BG70, BG72+0 Blender     Red - R24, R27, R37, R39
Green - YG91, YG93, YG95, YG97     Pink Cheeks - R00, R20     Orange Nose - Y39, YR04, YR07
Outline - C00     Brown - E31, E33, E35     Grey - C4, C6, C8

3D Instructions - By Mariska Van Der Veer found in the Whimsy Stamps Inspirations Magazine dated December 2011 - Issue 5.

     3D Background Under Pieces is Copic W5
     3D Pieces were outlined using Copic W10
     3D Glue is made by OLBA and called Lijm Kit...I bought this from Whimsy Stamps


Thanks for stopping by...
 
Hugs...


Tuesday, July 24, 2012

Book Card - Girlfriends

I really love Book Cards.  Today I am showing one I made for my good friend "Syble" for her birthday.  I knew she would get a real kick out of this and of course neither of us is 29 years old or 110 lbs anymore...haha.

I had just received the new "Wedding Dress Tag" from Whimsy Stamps and was so excited to use it in this card.  They have some really great Metal Dies.  You can find their web site at whimsystamps.com.  It's such a cute dress and doesn't really have to be used only for weddings.  As you can see I used it in this birthday card as an element which I added into the pocket of the inside of the Book Card.  I found the directions for the Book Card on a blog tina46klix.blogspot.com.

Front of Card


End Binding and Front of Card
Inside of Card
Inside Cover - Left Side Close Up
Inside Cover - Right Side Close Up
Back Side of Card

Items used for this project:
          Paper - Bazzill Card Stock White - Basic Grey "Sugar Rush"
          Rubber Stamps - Art Impressions "Girlfriends UMQ3590 & UMF3572" and Whimsy Stamps
                    "Hand Made Letter Seals"
          Digital Stamp - Bizzy Becs "Digi Ticket Stubs "A Little Bit of Everything"
          Flowers - Wild Orchid Crafts
          Metal Dies - Go Kreate "Frilly Square #2", Memory Box "Macarena Corner", Whimsy Stamps
                    "Corner Die Set", Cherry Lynn "Butterflies", DooHickey "Vintage Leaf and Heart Swirl" and
                    Dienamics "Dizzy"
          Inked Edges - Distress Ink "Dusty Concord"
          Sparkle & Shine - Stickles "Stardust" and Glossy Accents by Inkssentials
          From My Stash - Ribbon, Twine, Pearls, Gems and 2 Doilies (a heart and circle)
          Punch - Martha Stewart "Double Scallop"
          Petal Pin by Prima
          Gem Stone by Prima

          Colored with Copics - E0000, E00, R01, E50, E31, E25, YR0000, YR00, YR02, Y000, Y02,
                    Y21, R83, R85, B60, B63, BV02, G40, YG11, YG61, E41, E42, E33, E35, E37 and
                    shadow is C00

Thanks for stopping by!

Hugs, Patti