Sunday, August 11, 2013

Doll Canvas 8x8

Hi again...here the second class taught by Julie Nutting that I took on Saturday at the Scrapbook Island store.

This project uses mixed media techniques, another Julie Nutting Doll Stamp and the Prima Divine Paper Collection.  The canvas is painted using the Studio paint Classic Teal mixed with an off white acrylic paint from Michaels (don't know what brand it was).  We glued wings and some words of wisdom on the right side of the canvas and a piece of ruler paper on the left.  When that was dry we used a Crafters Workshop Stencil  "Reversed Chicken Wire" and sprayed in a few places using a pink colored Tattered Angels spray (didn't get the name of this either).  Then on top of the spray we used Heavy Gel Paste mixed with the same off white acrylic paint as above and, using the Crafters Workshop Stencil "Flower Frenzy", spread it over the stencil to create a really great textured effect.  It took quite awhile to dry but while that was drying we stamped and clothed our Doll...so pretty!  She was added to the canvas along with some ribbon and flowers for our finished project...and I even had thirty minutes of class time to spare!  WOW!!!  It was really a fun day and so wonderful to meet and learn from Julie.  She really is amazing!

Here's my finished canvas...Enjoy!

Prima Doll #910280


Again thanks for stopping by!

Hugs...


Doll Tag Class with Julie Nutting

Yesterday I participated in a class taught by Julie Nutting at my favorite scrap booking store "Scrapbook Island".  Julie is the creator of the wonderful doll stamps produced by Prima.  She grew up in Cupertino but now lives in the LA area not far from Prima headquarters.  It was so great to have her here teaching for all of us.  In the first class of the day (she taught two separate classes Saturday) we made two very cute tags using her Doll Stamps, her Tags and Prima papers from the Divine Collection.  It was a really fun project and we finished most everything in the two hours of the class.

However...when I got home I wanted to add some things that we did not do in the class and I really LOVE how they turned out.  I added lots of Stickles Star Dust for that glittery look around the wings, shirt ruffles, flower petals, swirl dots in the background and small dots on the doily.   I also used some Glossy Accents so that the shoes and headbands shined.  I can't wait to make more they are so fun to do, it's like paper dolls when I was younger...lol.

Here they are my Beautiful Tags!!!


Doll Stamp is Prima #910242


Doll Stamp is Prima #910259


Thanks for stopping by!

Hugs...


Saturday, August 10, 2013

Mixed Media Collage Canvas using Shimmerz

Recently I took apart a bunch of old laptop and desk top computers that my husband had out in the garage to be thrown away.  My grandchildren helped out too...and they had so much fun doing it!  We collected all kinds of connectors, nuts, bolts, plugs, pc boards, wires...well you get it, we collected everything we could find in the old computers.  Now I have two containers full of fun junk to use on my mixed media projects.

Today I'm going to share a mixed media canvas that I made following a YouTube video that was posted by Miranda Edney.  You can find her project HERE.  I really loved the Shimmerz products she used so I used the same.  I did try to use a lot of different flowers, wood pieces and mechanical  items to try to make it more my own but the final canvas still looks very close to hers!  I think that's because I used the same Shimmerz products and colors and the same Prima stencil.  Another difference is that my canvas is an 11 x 17 canvas and I think Miranda's is an 8 x 10 canvas.

I do really love it and I was able to use some of those computer parts the grand kids and I collected (which was soooo exciting...lol).  You can't really tell they are there but if you look at the close ups you might be able to make out the two small pc boards and a connector.  The pc boards are located under all the other pieces across the top and down the left side, and the connector is on the top closer to the left side of the canvas.  Can you see them???  I think that the fun in using them is that you can't tell where they are but those pieces give the project lots of added texture and dimension.

So here it is, I hope you like it...and don't forget to check out Miranda's blog as she makes the most amazing projects.


close-up of top

close-up of bottom

The Shimmerz products I used are...Cotton Candy Spritz, Pop Art Pink Vibez, Truffle Spritz, Princess Vibez, Patina Texturez, Crushed Coral Texturez, Artichoked Texturez and Tidy Widy Texturez.  These can all be purchased HERE.


Thanks for stopping by...

See You Again Soon...

Hugs...


Sunday, August 4, 2013

Grungy Spell Book (Journal)

Today I'm sharing a project I made in a class I took at the Scrapbook Island, my favorite scrapbook store. It's the very first Mixed Media Journal that I have ever made and I have decided this kind of art is just what I want to do now!  It is so challenging and fun (also very, very messy...lol).  I am finding so many new and exciting paints, sprays, and gels.  WOW!  I have moved most of my card making supplies to the back and all of my new mixed media things to the front!

Our teacher was Anna Dabrowska "Finnabair" from Prima.  What a wonderful and fun class!  I learned so much from Anna.  She is from Poland and is such a great Mixed Media Artist...you should check out her blog HERE.  I have been following her blog for quite a while so when I learned she was going to teach a couple of classes here I was sooooo excited!  The classes were held on a Sunday and a Monday...this was the Sunday Class.  It was a nine hour class, and a very long day but I LOVED IT!!!  If you ever get a chance to take a class from Anna please do...she is such a great teacher and very encouraging while you are working.  She pushes you to find your own style, not just copy her samples.  She also works along with you step by step so you know exactly what to do, how to do it and when to do it.  She gave us great tips and tricks too!  She believes you should and can use anything you want in your art...ie: nuts, bolts, screws, computer parts, pop tops from coke cans, springs, wire screen, canvas, lace, string...well you get the idea, the list is endless.  She told us "if you can glue it on your canvas you can use it!" and she does too!

I LOVE HER!!!

She also shared with us the use of two products made by Luminarte...Silks and Primary Elements.  You can buy this product HERE.  This product is so fun to work with and the colors are amazing.  One is a paint and the other is a powder that you mix with water and spray on your project or you can mix it with gel and use it as a paint.  They are so shimmery too!

Anyway here is my project.  I isn't completely finished as we only worked on three double pages and the front and back covers of the journal.  I did complete one additional double page at home, and there is a slot in the back for anything you want and I decided I wanted a large tag there, so I finished that also.

Front of Journal
Back of Journal


Tag Pocket Page
Back of Tag
Front of Tag

Here is a list of the items I used...some were provided by Anna in her class (most actually) and some I had at home and used.  Most of the items are from Prima because that is who she works for...

Prima Items:
Resist Flowers
Wood Pieces - xoxo, flowers, gears & leaves
Say it in Crystals
Clear Epoxy Stickers
Sunrise Sunset Collection by Finnabair - Papers, Canvas Alpha, Gold Flowers, Mixed Media Journal
     Vintage Trinkets - Roman Numerals, Brads, Metal flowers, Gears, Tags, Washers & Bottle Caps
Prima Stencils - Dot Lines # 564261 & Donna Downing flowers #922436
Prima/Finnabair Stencils - Doily #960155, Dot Flowers #960162 and Checkered #960179 & #960186
Prima Clear Stamps - Words #545055, Bricks #960896 (Finnabair), Checker #960865 (Finnabair),
     Words #563134 (Lady Bird Collection), Diamonds #960834 (Finnabair), Dot Flowers #960148
     (Sunrise/Sunset Collection), and Words #960964 (Finnabair)

Luminarte Silks Paints - Ginger Peach, Olive Vine, Bolivian Blue and Solar Gold
Luminarte Primary Elements (mixed with water for sprays) - Olive Vine, ginger Peach, Teal Zircon,
     Bolivia Blue and a mixture of Nutmeg, Autumn Butternut & Burnt Umber to make a light brown/tan color

Miscellaneous Items used:  Ranger Archival Ink Black, Copic Multi Liner Pigment Ink,
     Graphite Pencil 6B, Masking Tape, Brads, Buttons, Snaps, Lace, Eyelets, Clear Acrylic Balls,
     Lace Flower in orange, White Thread and a Metal Key.

There may be other items but these are the ones I could still identify...lol!


Thanks so much for stopping by...

See you again soon...

Hugs...


Sunday, July 14, 2013

Sabrina Birthday Card


Hi everyone! 

It's been quite awhile since I posted something because I've had a lot of other things going on around here.  Our family took a vacation to Beaches Resort in Turks & Cacaos in June...fun, fun, fun!!!  Then in July we hosted a "Hashigami Family Reunion", which is my mother in-law's family.  We had a house full of guests and a 50 person weekend party!  It was a great time but I haven't had much time for crafting! 

Everyone's gone now and so I can finally get back to my Craft Room/Studio.  I won't be making many cards for now because I am learning some new arts using canvas, papers, gels, paints, sprays, stencils, gelatos and lots of metal trinkets.  As I finish my projects I will post them here! 

I did finish the card I'm going to show you today, back in May, and recently sent it off to my best friend for her birthday!  I used a Saturated Canary Digital called Sabrina and Digital papers from Nit Wit called Hello Sunshine.  I love how it turned out it's so pink and pretty...

Front

Inside


My Project Recipe:
     Digital - Sabrina by Saturated Canary
     Stamps - A5 Verses set 10 by LOTV and Everyday Button Sentiments, Everyday Mini Postage
          Stamp Sentiments by Whimsey Stamps
     Paper - Bazzill White and Hello Sunshine digital Papers by Nit Wit Collections
     Flowers - Wild Orchid Crafts and Recollections
     Paper Punches - Diamond Lace by EK success
     Metal Die - Label 10 & Oval Petite Large by Spellbinders, Swirly Lace by DooHickey and
          Decorative Duo by DieNamics
     Inked Edges - Distress Ink Frayed Burlap
     Sparkle & Shine - Stickles Star Dust and Glossy accents by Inkssentials
     My Stash - Ribbon, Pearls, String, Button, Lace and Charm
     Photo Corners - Embossed Using Fran-tage Aged Rose Embossing Enamel
     Metal Butterfly - Embossed using Fran-tage Shabby Pink Embossing Enamel
     Butterflies - Recollections
     Miscellaneous - Ticket by Maya Road and Film Strip by Tim Holtz

Colored in Copics:
Face E0000, E00, R01          Pink RV000, RV10          Blue BG000, BG01, BG05
Yellow Y32, Y35                  Hair E50, E31, E25


Thanks for stopping by...
 
See You Again Soon...
 
Hugs...
 

Monday, May 27, 2013

3D Dress Form

Hello Friends!

I have a great craft project to show you today.  It's a 3D Dress Form using the Tim Holtz Die called Sewing Room.  I was so inspired after watching a You-Tube video by Ms Liberty, which you can find HERE, that I immediately went shopping for this die so I could make one too.  It was harder than I thought it would be to find this die though...it's from an old Tim Holtz release and it would take me hours to track one down.  I looked in all of the stores in my area that carry Tim Holtz products and on my very last stop I found one, their last one too!  On my way home I stopped by a used book store and purchased, for $1.99, an old book with yellowed pages for cutting out the Dress Forms used for the 3D look.

Here is my finished 3D Dress Form...I Love It!  I can't wait to make more that I can give as gifts to some of my friends and family...

Front

Back Side

My Project Recipe:
     Stamps - Delicate Pattern by Penny Black
     Paper - Fairy Rhymes by Prima & pages from an old book
     Flowers - Petaloo & Wild Orchid Crafts
     Wood Letters "XO" by Prima - Embossed using Stampendous Fran-tige Shabby Pink Embossing
          Enamel
     Metal Die - Sewing Room by Tim Holtz and Nesting Circles by Life Style Crafts
     Hanger & Bird Paper Clips by Prima - the bird is embossed using Stampendous Fran-tige Shabby
          White Embossing Enamel
     Film Strip by Tim Holtz
     Travel Ticket by 7gypsies
     Flutter Bits Almanac Butterflies by Prima
     Inked Edges - Distress Ink Vintage Photo
     Stickles Star Dust & Warm White paint by Americana
     From My Stash - Lace, Pearls, Metal Butterfly, Chain & Pearl Brad


Thanks for stopping by...

Hugs...


Tuesday, May 21, 2013

Doll Tag #1


Hello Friends...

I have a confession to make...I am in LOVE with Mixed Media Projects and all things Prima!  I've started watching You Tube videos from the Prima Live programs and wow...they make the most amazing things.  A lot of the projects are what is called Mixed Media and I LOVE THEM!!!  In the month of July I have signed up for a couple of classes at my favorite scrap-booking store "Scrapbook Island" that will be taught by Anna Dabrowska who is part of the Prima Design Team.  I can't wait, I'm so excited!!!

Anyway one of the videos I watched this week is "Mixed Media Doll Stamps with Julie Nutting" on Live with Prima.  Her tags are so cute!  I watched her video and made a tag myself following her instructions.   I didn't have everything she used but I had lots of other things that worked out great.  This tag is just one of six Doll Stamps that Julie designed for Prima Marketing.  I have all of the others and will be making more tags using them in the future.  I think these tags will be so cute attached to wrapped gifts instead of a card...the back side of the tag is blank so that is a perfect place to write a message and then sign my name.

My friends and family are going to love, love, love these!!!


By the way...Prima makes lots and lots of different things...papers, flowers, stamps, inks and embellishments galore.  I really love them all!


My Project Recipe:
     Stamps - Doll #910143 by Prima, Doodle Border by Fiskers and Lifetime by Prima
     Paper - Tag by Prima, Fairy Rhymes & Divine by Prima and The Sweetest Thing - Blueberry by My
          Minds Eye
     Flowers - Petaloo and Prima...there is also a wood flower colored using Prima Chalk Coldsfoot Petals
     Pearl Brad by Recollections
     Pearl Swirl by Kaiser Craft
     Butterfly by Prima
     Nature Icon Acrylic Button - Clearly Yours by K&Company
     Metal Die - Dizzy Doily by Die-Namics
     Tissue Tape by Tim Holtz
     Inks - Distress Ink Vintage Photo and Memento Black
     Sparkle & Shine - Stickles Star Dust and Glossy Accents by Inkssentials
     My Stash - Ribbon, Metal Gear and Seam Binding colored using Patina by Glimmer Mist and Turquoise
          by Perfect Pearls

     Colored in Copics:  Hair  E50, E31, E25


Thanks so much for stopping by...

See you again soon...

Hugs...


Monday, May 20, 2013

Secret Garden Book Cover Class

Happy Monday!

My youngest daughter and I attended a craft class at our favorite scrap-booking store yesterday!  It was so much fun!  We learned to use a lot of different products and techniques, which of course we ended up buying on our way out the door.  Lots of $$$$$ spent...haha!  Very fun mother/daughter day!

I'm going to show you some pictures of our finished product.  We were all given a copy of a hard cover book, The Secret Garden written by Frances Hodgson Burnett.  Everyone's covers looked a little bit different because of the amount of oxidization on the binding and fence, and the amount and types of flowers used on the cover.  The book mark was of our own designs and made at home because the teacher didn't have time to design one for the class to copy...I really like how mine looks.  I added a couple extra things from home  but most of the items came from the teacher... A great Big Thanks to Karen France of Scrapbook Island, you are a great teacher!!!!

So here is my finished book cover & book mark...

Front of Book with Book Mark

Back Cover and Back Side of Book Mark

Book Mark

Inside Front Cover

Inside Back Cover

My list of thing used in this class:
     Secret Garden Book By Frances Hodgson Burnett
     Secret Garden Papers by Graphic 45
     Gesso
     Foam Sponges
     Viva Croco Crackling Color "White" mixed with Studio Semi-Gloss Acrylic Paint "Traditional Tan"
     Glue for paper on paper we used Studio Multi Medium Matte
     Glue for the book binding we used Red Wonder Tape by Inkssentials with Crafters Pick "The Ultimate
          Glue" for extra strength
     Glue for embellishments, Moss and flowers we used Fabric Tac by Beacon Adhesives
     Distress Clear Crackle by Ranger "Rock Candy"
     Distress Ink edging using Vintage Photo by Ranger
     Embossing folder ?  I can't remember the name of it...
     Adirondack Alcohol Ink Mixatives "Pearl" by Ranger
     Ten Seconds Studio Ver-Day Paint the 2 oz. kit.  We used the Bronze in the kit and the Ver-day Spray
     Lace and Seam Binding Ribbons in numerous lengths and widths
     Tim Holtz die "Fence"
     Crochet Flower
     Plastic white cameo painted using the Bronze Ver-Day Paint
     Bronze Eyelets
     Chipboard Key painted Bronze and then oxidized with the Ver-Day Spray Kit
     Tim Holtz Grunge Paper which we used for the spine, piece behind front picture and the fence.  After
          painting, Oxidizing and running through the Embossing Folder these pieces looked and felt just
          like leather...amazing
     Lots of small flowers and some moss
     Book Mark has a Metal Butterfly Paper Clip by Prima and two Doily's made using Decorative Duo Dies
          by Die-Namics
     Stickles Star Dust for some sparkle on the book mark
     Glossy Accents to attach the Cameo to the Crocheted Flower center


Thanks for stopping by...

See you again soon...

Hugs...


Thursday, May 9, 2013

Mother's Day - Cho with Parasol


Happy Thursday!  I finished my second Mother's Day card today and this one will be for my Mother In-Law.  The card is really an over-sized tag inside of an envelope of sorts.  I copied an original design by Dena Concienne, you can find her blog HERE.  She does great work so stop on by her blog and check it out.

I used Cho with Parasol by Lily of the Valley and I didn't have any square or rectangle doilies so I made mine using a Martha Stewart punch around the page paper punch and then embossed the cardstock with a pretty design.

Here is my card/tag...Enjoy!

Envelope with Tag inside

Tag

Envelope with Tag removed


My Project Recipe:
     Stamps - Cho with Parasol by Lily of the Valley and Because of You by Verve Stamps
     Paper - Bazzill White and The Sweetest Thing - Bluebell by My Mind's Eye
     Flowers - Wild Orchid Crafts and Petaloo
     Paper Punches - Branch & Deco Fans by Martha Stewart
     Metal Die - Swirl by DooHickey, Label Stacklets 3 by Taylored Expressions, Petite Scalloped Circles
          Small by Spellbinders, Nesting Circles by Lifestyle Crafts and Butterfly by Cheery Lynn Designs
     Embossing Folder - Cuttlebug by Provo Craft
     Inked Edges - Distress Ink Vintage Photo
     Sparkle & Shine - Stickles Star Dust and Glossy accents by Inkssentials
     My Stash - Pearls and Lace

Colored in Copics:
Face E0000, E00, R01     Hair E50, YR30, E31
Pink RV91, E04
Blue BV70, BV72
Gold Y32, Y21, Y26
Yellow Y00, Y13
Brown E41, E43
Green G21, YG03
Outline Dots C00, C1


Thanks for stopping by...

Hugs...


Tuesday, May 7, 2013

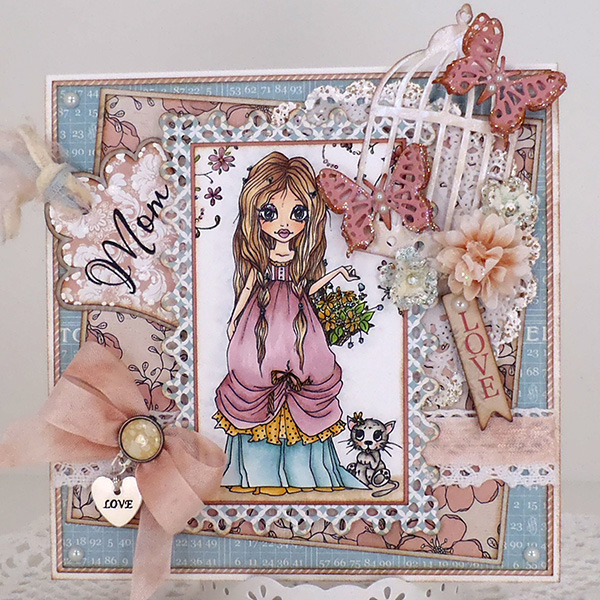
Mother's Day - The Seasons Spring Time II

Hi Friends...I finished my mom's Mother's Day card today and before I send it off to her I wanted to share some pictures of it.  I really like the colors I used and love the new digital I got this week from Saturated Canary. I know my mom will love it and that's what really matters...

I actually picked the Summer Stories 6x6 paper pack first.  Then I saw the Saturated Canary Challenge and its colors kind of fit into the color pallet they have posted so I'm going to enter this card into their new Challenge #42 which you can find HERE.  The pink might not be quite bright enough but the other colors fit beautifully!

Also to all you mothers out there "Happy Mother's Day"!  Enjoy your day, I'm sure you deserve it!

Here is my finished card...Enjoy...


My Card Recipe:
     Digital - the Seasons Spring Time II by Saturated Canary
     Stamps - Because of you by Verve Stamps and Floral Flourish by Paper Inspirations
     Paper - Bazzill White and Summer Stories 6x6 Designer Pad by Teresa Collins
     Flowers - Wild Orchid Crafts and Prima
     Metal Die - Nesting Doily Rectangles by QuicKutz, Scalloped Tag by DooHickey and Butterfly
          by Cheery Lynn Designs
     Inked Edges - Distress Ink Vintage Photo
     Sparkle & Shine - Stickles Star Dust, Glossy Accents by Inkssentials and Stampendous Fran-tage
          Shabby Blue, Shabby White & Chunky White Embossing Enamel
     My Stash - Ribbon, Brad, Charm Pearls, String, Lace and Doily
     3" Bird Cage Die Cuts came from a packaged set from Zumacrafts

Colored in Copics:
Face E0000, E00, R01          Hair E50, E31, E25
Eyes B41          Lips RV10, RV11        
Pink RV91, E04        
Blue BG70, BG70+BG72        
Yellow Y32, Y21, Y26        
Green G21, YG03
Cat W00, W2, W4, W6


Thanks for stopping by...

See you again soon...

Hugs...